
Linux: Deploying a Linux Server VM in Proxmox VE
How-To: Proxmox and Linux


Monday 21st April 2025
Updated 4th September 2025
Updated 4th December 2025
I first hesitated if I was going to write about this or not. In one way, setting up a Linux VM in Proxmox is so easily done that it felt unnecessary to cover. But there are actually many knobs and levers to choose from when creating a VM. I’m not claiming to be an expert in virtualization, but I thought I could share my configuration of one Linux VM, and my reasoning behind the choices I made.
Creating a Linux Virtual Machine
Step 1: General

Explanation:
The ID is just a number. Whenever i get to choose a number series I always try to have some kind of reasoning behind it.
The name “sauna-temp” is because the first VM is going to be a template to clone from.
Step 2: Operating System

Explanation:
I choose Ubuntu Server 24.04 because of the intuitive way of configuring network settings. However, even if I chose Fedora, Arch or SUSE for example, the other settings that follows will most probably be the same.
Step 3: System (updated)
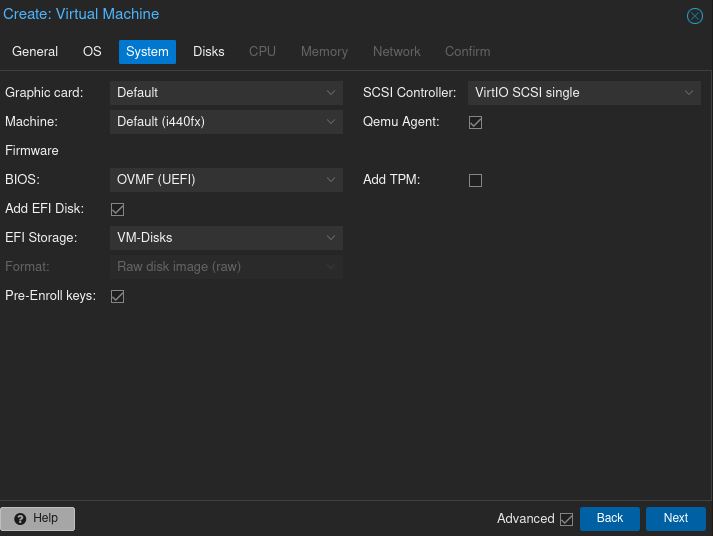
Explanation:
The Qemu Agent, is similar to how VMWare Tools work; it is a service that runs inside a VM, providing a communication channel between the host (Hypervisor) and the guest (Virtual Machine).
Update: Make sure you use UEFI instead of BIOS. This is mainly for GPT support.
The rest I left at default settings
Step 4: Disks
The Primary Disk
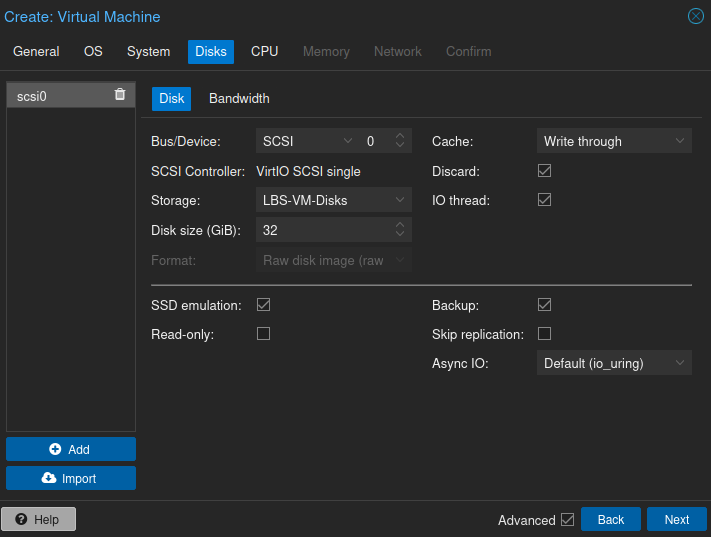
Explanation:
“VirtIO Block”is recommended by proxmox as it is more maintainedUpdate: I don’t know where I read that but looking into it again, it seems like SCSI is the newer and recommended choice. From Proxmox documentation:
A SCSI controller of type VirtIO SCSI single and enabling the IO Thread setting for the attached disks is recommended if you aim for performance.
The VirtIO Block controller, often just called VirtIO or virtio-blk, is an older type of paravirtualized controller. It has been superseded by the VirtIO SCSI Controller, in terms of features.
“SSD Emulation” can increase read/write speed but ONLY if the physical disks are actually SSDs.
"Write through" cache mode is safer than no cache in case of power failures, but a bit slower.
"Discard" are recommended when using NVMe disks but I don't see any reason not to use it on any type of disk
“IO thread” are available for VirtIO and SCSI and seems recommended to have enabled
The Secondary disk
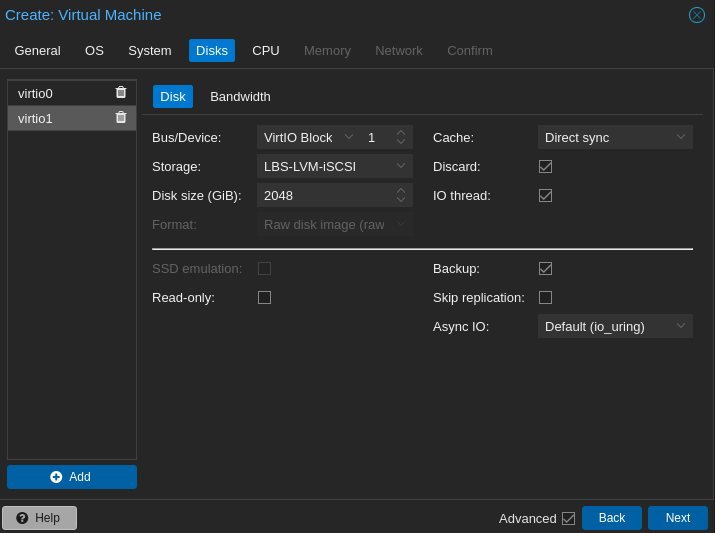
Explanation:
"Direct sync" cache mode is the slowest, but safest option. Seems alright for iSCSI storage, where I have struggled with data corruption due to power outage before.
Note: read more about cache modes here: https://pve.proxmox.com/wiki/Performance_Tweaks
Step 5: CPU

Explanation:
The Type should be something close to what the physical CPU actually is. lscpu says I have "x86_64 Architecture” but no version information is shown, so I chose the highest version available (x86-64-v4).
root@lbs-pve01:~# lscpu
Architecture:             x86_64
  CPU op-mode(s):         32-bit, 64-bit
  Address sizes:          46 bits physical, 48 bits virtual
  Byte Order:             Little Endian
CPU(s):                   24
  On-line CPU(s) list:    0-23
...
Step 6: Memory
I chose 8 GB of memory. It can be increased at a later time if necessary.
Step 7: Network
1st Network Adapter
You can only create one Network adapter at the initial setup but you can add more once the VM is created. First I add the OVS bridge that I created in Proxmox Setup Part 2: Network

Explanation:
When no VLAN tags are set on an OVS bridge, the adapter works as trunk port and you can define any VLAN you want inside the Guest OS.
This network adapter is going to be used to connect to external networks
The firewall option relates to security groups to for example filter intra-VM traffic. I unchecked that until I have configured some zones. That might be a topic for a later post.
More information about Proxmox Firewall: https://pve.proxmox.com/wiki/Firewall
2nd Network Adapter
Next step is just a summary. Once finished, I added another Network Adapter to the VM. This is a second OVS bridge that has no external connections:

Explanation:
This bridge is going to be used for Special Container Networks. Note that normal container bridge network types doesn’t need this, but it can be used by services if the driver is “macvlan” or “ipvlan” is used.

Now it’s time to power up the VM and start the installation.
Note: Installing Ubuntu Server is not part of the scope here but I have written about installing Linux before. This one might be the most relevant: