
Proxmox VE Setup Part 2: Network
How-To: Proxmox Setup Part2

Monday 24th February 2025.
Updated 4th December 2025.
In Part 1 I described how to prepare for and install Proxmox. Now we are going to configure the network
Network adapter options
There are 2 ways you can configure network adapters in proxmox:
Linux bridges and bonds
OVS bridges and bonds
OVS = Open Virtual Switch is a more flexible option as it works as a transparent switch. If no VLAN tags are set on an interface, the adapter works as trunk port and you can define any VLAN you want inside the Guest OS.
Note: OVS bridging doesn’t work if SR-IOV is enabled. ARP looks good, MAC address table looks good, but no traffic gets through.
Network Setup
I wanted to create something where I can host virtual machines for others, put them in groups so they cannot speak to other customers, and run their own services. This is the Layer 2 design on how I accomplished it:

Explanation:
The outside network peers over eBGP with a VyOS virtual router. This router interconnects with all the servers. Firewall rules or route filtering has to be implemented to prevent customers to communicate directly to each other.
There are 3 VRFs defined: NMS = Network Management Services, INT = Internal Services and PUB = Public Services. Note that this is a layer 2 diagram so no routing information is displayed.
To avoid VLAN 10, 20 and 30 on Customer 1, to become the same VLAN 10, 20 and 30 on customer 2, I created one OVS bridge per customer. These bridges are not associated with any physical ports, since those networks operate entirely inside Proxmox.
VLAN 10, 20 and 30 can be used for docker services with mac_vlan driver, or any custom network driver that uses external network connections. They don’t have to be used for every service.
Proxmox VE Network Configuration
Go to node_name > System > Network
Management Interface
My MGMT interface is the built-in 1Gb/s interface on the motherboard, identified as eno1. In the installation, Proxmox has already created a default Linux bridge that binds that interface. Mark vmbr0 click Edit

Most likely you already have an IPv4 address defined. But an IPv6 address can’t be entered during the installation.
Configure OVS
Step 0: Install OVS packet
To create the network topology in diagram above, first start with installing the required dependency:
apt install openvswitch-switch
Step 1: Configure OVS Bridge
Start with creating an OVS Bridge interface by clicking Create > OVS Bridge:
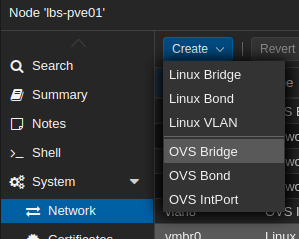
There is not much you have to configure here. You can increase MTU if you want:

Apply the configuration:

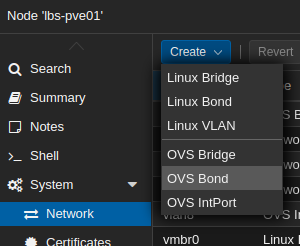
Step 2: Create OVS Bond
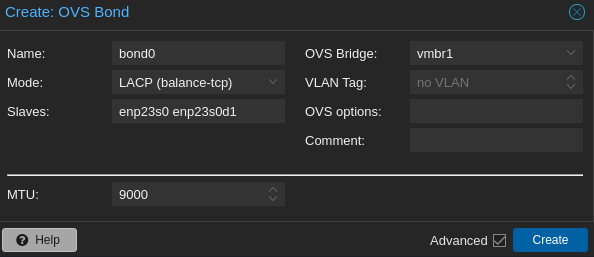
I have two network adapters that i wish to aggregate and bind to this bridge. Click Create > OVS Bond
Settings:
OVS Bridge: vmbr1
Mode: LACP (balance-tcp)
Slaves: enp23s0 enp23s0d1
MTU: 9000 (optional)
Update: I discovered that a bond requires at least two member interfaces. Otherwise the bond won’t become active. Why would you have a bond with only one member? Two reasons:
I can easily add and remove members later.
For automation; I can refer to the bond interface name instead of the physical interface name, which could be different on another machine. You could also create bridge interfaces for this purpose. However, this might make more sense on network appliances.
Apply the configuration.
Now you can verify that the LACP port binding is established on the switch. I have a Cisco switch:
SAUNA-SW1#show int status | i Status|Te1/1/[1-2]|Po3
Port      Name            Status     Vlan    Duplex  Speed Type
Te1/1/1   LBS-PVE01 eth1  connected  trunk   full    10G SFP-10GBase-SR
Te1/1/2   LBS-PVE01 eth2  connected  trunk   full    10G SFP-10GBase-SR
Po3       LBS-PVE01 bond0 connected  trunk   a-full  a-10G N/A

SAUNA-SW1#show etherchannel 3 summary
Flags:  D - down        P - bundled in port-channel
        I - stand-alone s - suspended
        H - Hot-standby (LACP only)
        R - Layer3      S - Layer2
        U - in use      f - failed to allocate aggregator

        M - not in use, minimum links not met
        u - unsuitable for bundling
        w - waiting to be aggregated
        d - default port

        A - formed by Auto LAG


Number of channel-groups in use: 3
Number of aggregators:           3

Group  Port-channel  Protocol    Ports
------+-------------+-----------+---------------------------------------
3      Po3(SU)         LACP        Te1/1/1(P)      Te1/1/2(P)
Step 3: Create an OVS IntPort
An IntPort is another word for SVI, a layer 3 interace. This might be necessary if you for example are planning to implement iSCSI storage from an isolated storage network, like I do.
Click Create > OVS IntPort:

Settings:
Name: vlan8
OVS Bridge: vmbr1
VLAN Tag: 8
IP or IPV6 address
MTU: 9000

Notes:
Gateway is not necessary if it’s an isolated network
The name can be anything, but I guess vlan8 makes the most sense.
Step 4: Add the OVS bridge to the Guest OS
When you are adding the OVS bridge to a VM you have two options:
Either you can set a VLAN tag and the Guest OS will be bound to that VLAN;
Or you can put no VLAN tag, which means the port will become a trunk and you can configure VLAN tagging inside the Guest.

And that concludes Proxmox VE network settings. In the future I will show how I configured the router to interact with the virtual network.