Install Linux on 2 disks.
Linux Tutorial #1: Advanced Task 2
When using 2 disks, it’s very common to mount the /home directory on the secondary disk. (Let’s call the disk with the root directory for the Primary disk, and the disk with the home directory for the Secondary disk). The /home directory btw, is where all the user data will be stored, and that is why it’s a good idea to use a disk with relatively large volume for that.
Note: More on Linux directories in the upcoming tutorials.
For this to work you need to make a manual configuration under disk setup.
Create new partitions
Assuming you are at the Kubuntu installation setup screen:
Step 1: Under Disk Setup, choose manual instead of use entire disk. Click Next.
Note: On Ubuntu, it is called other.
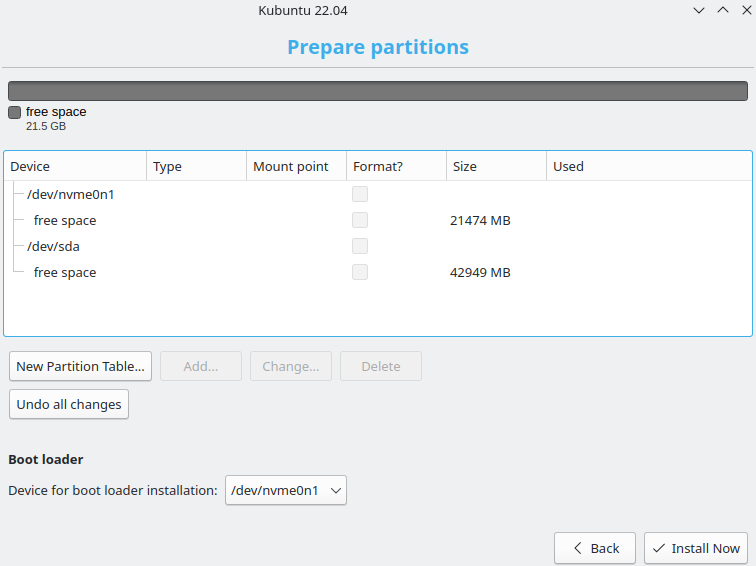
This page will show up:
Step 2: Delete all the old partitions until it ends up looking similar to the picture above.
Note: No configuration changes will take place until you press Install Now.
Step 3: Click on the devices. A popup will appear, asking if you want to create new partition tables. Click Continue.
The result will look similar to this:
Define Root and Home directory, and create a swap partition
Step 4: For the primary disk (in this example it is /dev/nvme0n1), create a partition for “/” (root) and use the entire disk. Click on free space.
The partizion size is by default set to max
Location: Beginning of this space
Use as: Ext4 journaling file system
Mount point: /
Note: You might notice that there are plenty of other directories that you can mount. When selecting “/”, it will place all directories under the same partition, unless other directories specifically have their own mount points defined.
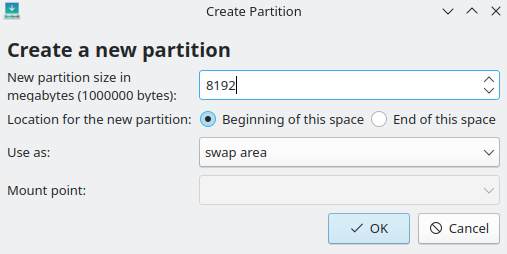
Step 5: For the secondary disk, first create a swap partition. Click on free space under the secondary disk (in this example, it is the /dev/sda).
The disk space should be twice the size of the installed RAM memory on the computer.
Location: Beginning of this space
Use as: swap area
Note: You don’t have to create a swap partition, but it’s recommended. Mainly because the system won’t be able to hibernate without it. The faster disk used for swap, the better performance.
Step 6: For the remaining space on the secondary disk, create a partition for the /home directory.
The partition size is by default set to max
Location: Beginning of this space
Use as: Ext4 journaling file system
Mount point: /home
The end result should look similar to this:
Verify and start the installation
Step 7: Verify that the partitions is setup correctly. You can revert back to the beginning by clicking Undo all changes.
Step 8: Verify that the Boot loader is set to the primary disk.
Step 9: Click Install Now
Related Topics
Linux Tutorial #1: Installing Linux
Installing Linux on a M.2 SSD Drive


