
Nvidia ConnectX 3 configuration
How-To: Mellanox ConnectX 3

Last post went through some theory about SmartNICs features. This post is more practical.
Setup
I have installed a Mellanox ConnectX-3 on a workstation that is installed with Proxmox. Proxmox is based on Linux Debian.
Configuration
Upgrading the firmware
Source: https://that.guru/blog/updating-mellanox-connectx-3/
Step 1: install mstflint:
apt install mstflint
Note: You may get this when trying to install software:
Reading package lists... Done
Building dependency tree... Done
Reading state information... Done
E: Unable to locate package mstflint
This is Proxmox/Debian related. If you add “non-free” and “non-free-firmware” to /etc/apt/sources.list, it will work:
# Contents of /etc/apt/sources.list:

deb http://ftp.no.debian.org/debian bookworm main contrib non-free non-free-firmware

deb http://ftp.no.debian.org/debian bookworm-updates main contrib non-free non-free-firmware

# security updates
deb http://security.debian.org bookworm-security main contrib non-free non-free-firmware
Step 2: Find the PCI slot for the Mellanox card:
root@pmox:~# lspci | grep Mellanox
17:00.0 Ethernet controller: Mellanox Technologies MT27500 Family [ConnectX-3]
Step 3: Query the NIC with mstflint:
root@pmox:~# mstflint -d 17:00.0 query
Image type:            FS2
FW Version:            2.42.5000
FW Release Date:       5.9.2017
Product Version:       02.42.50.00
Rom Info:              type=PXE version=3.4.752
Device ID:             4099
Description:           Node             Port1            Port2            Sys image
GUIDs:                 0002c90300a05260 0002c90300a05261 0002c90300a05262 0002c90300a05263
MACs:                                       0002c9a05260     0002c9a05261
VSD:
PSID:                  MT_1090120019
Note: My network card was already the latest version. It was a good thing to, because I can't find any firmware for that specific PSID. Therefore, the next step is taken directly from the source:
Step 4: After downloading the firmware and unzipped it, perform this command:
mstflint -d 02:00.0 -i fw-ConnectX3-rel-2_42_5000-MCX312A-XCB_A2-A6-FlexBoot-3.4.752.bin burn

Current FW version on flash:  2.30.8000
New FW version:               2.42.5000

Burning FS2 FW image without signatures - OK
Restoring signature                     - OK
Configure Mellanox ConnectX features
Sources:
Verify current Configuration
To view current configuration of your mellanox card, use the mstconfig command:
root@pmox:~# mstconfig -d 17:00.0 query

Device #1:
----------

Device type:    ConnectX3
Device:         17:00.0

Configurations:                              Next Boot
         SRIOV_EN                            False(0)
         NUM_OF_VFS                          8
         LINK_TYPE_P1                        ETH(2)
         LINK_TYPE_P2                        ETH(2)
         LOG_BAR_SIZE                        3
         BOOT_PKEY_P1                        0
         BOOT_PKEY_P2                        0
         BOOT_OPTION_ROM_EN_P1               True(1)
         BOOT_VLAN_EN_P1                     False(0)
         BOOT_RETRY_CNT_P1                   0
         LEGACY_BOOT_PROTOCOL_P1             PXE(1)
         BOOT_VLAN_P1                        1
         BOOT_OPTION_ROM_EN_P2               True(1)
         BOOT_VLAN_EN_P2                     False(0)
         BOOT_RETRY_CNT_P2                   0
         LEGACY_BOOT_PROTOCOL_P2             PXE(1)
         BOOT_VLAN_P2                        1
         IP_VER_P1                           IPv4(0)
         IP_VER_P2                           IPv4(0)
         CQ_TIMESTAMP                        True(1)
Explanations:
Link Type is Ethernet. It could alternatively be Infiniband.
SRIOV_EN = False means SR-IOV is not enabled
NUM_OF_VFS = 8 means up to eight virtual functions can be configured. A virtual function is the same as a virtual NIC.
IP_VER_P1/P2 = IPv4. I think it relates to RoCE traffic.
Change Mellanox Configuration
Activating SR-IOV:
root@pmox:~# mstconfig -d 17:00.0 set SRIOV_EN=1

Device #1:
----------

Device type:    ConnectX3
Device:         17:00.0

Configurations:                              Next Boot       New
         SRIOV_EN                            False(0)        True(1)

 Apply new Configuration? (y/n) [n] : y
Applying... Done!
-I- Please reboot machine to load new configurations.
Use IPv6 instead of IPv4:
root@pmox:~# mstconfig -d 17:00.0 set IP_VER_P1=1 IP_VER_P2=1

Device #1:
----------

Device type:    ConnectX3
Device:         17:00.0

Configurations:                              Next Boot       New
         IP_VER_P1                           IPv4(0)         IPv6(1)
         IP_VER_P2                           IPv4(0)         IPv6(1)

 Apply new Configuration? (y/n) [n] : y
Applying... Done!
-I- Please reboot machine to load new configurations.
Verification after reboot:
root@pmox:~# mstconfig -d 17:00.0 query

Device #1:
----------

Device type:    ConnectX3
Device:         17:00.0

Configurations:                              Next Boot
         SRIOV_EN                            True(1)
         NUM_OF_VFS                          8
         LINK_TYPE_P1                        ETH(2)
         LINK_TYPE_P2                        ETH(2)
         LOG_BAR_SIZE                        3
         BOOT_PKEY_P1                        0
         BOOT_PKEY_P2                        0
         BOOT_OPTION_ROM_EN_P1               True(1)
         BOOT_VLAN_EN_P1                     False(0)
         BOOT_RETRY_CNT_P1                   0
         LEGACY_BOOT_PROTOCOL_P1             PXE(1)
         BOOT_VLAN_P1                        1
         BOOT_OPTION_ROM_EN_P2               True(1)
         BOOT_VLAN_EN_P2                     False(0)
         BOOT_RETRY_CNT_P2                   0
         LEGACY_BOOT_PROTOCOL_P2             PXE(1)
         BOOT_VLAN_P2                        1
         IP_VER_P1                           IPv6(1)
         IP_VER_P2                           IPv6(1)
         CQ_TIMESTAMP                        True(1)
SR-IOV Configuration
To enable Virtual NICs, some additional configuration is needed.
Step 1: Enable SR-IOV in the driver:
nano /etc/modules-load.d/mlx4_core.conf
options mlx4_core num_vfs=4,4,0 port_type_array=2,2 probe_vf=4,4,0num_vfs = is the number of Virtual Functions for this server. In this example, 8 VFs are configured; 4 on each physical port.
port_type_array = is the port type of the interface, 1 is for infiniBand, 2 for Ethernet. In this example, both ports are Ethernet.
probe_vf = is the number of VFs to be probed in the hypervisor. (Read more about it from the original source). In this example, we will have 4 VFs on the first physical port probed, and 4 VFs on the second physical port probed.
Note: This is taken from Nvidias Documentation. More examples are available there.

Step 2: Reload the driver
modprobe -r mlx4_en mlx4_ib
modprobe mlx4_en
Note: mlx4 is the unix driver name for ConnectX 3 and 2.
Verification
You can verify virtual links with the ip link command or the ifconfig -a command (assuming the “net-tools” package is installed).
root@pmox:~# ifconfig -a
...
< other interfaces omitted >
...

enp23s0: flags=4098<BROADCAST,MULTICAST>  mtu 1500
        ether 00:02:c9:a0:52:60  txqueuelen 1000  (Ethernet)
        RX packets 0  bytes 0 (0.0 B)
        RX errors 0  dropped 0  overruns 0  frame 0
        TX packets 0  bytes 0 (0.0 B)
        TX errors 0  dropped 0 overruns 0  carrier 0  collisions 0

enp23s0d1: flags=4098<BROADCAST,MULTICAST>  mtu 1500
        ether 00:02:c9:a0:52:61  txqueuelen 1000  (Ethernet)
        RX packets 0  bytes 0 (0.0 B)
        RX errors 0  dropped 0  overruns 0  frame 0
        TX packets 0  bytes 0 (0.0 B)
        TX errors 0  dropped 0 overruns 0  carrier 0  collisions 0

enp23s0v0: flags=4098<BROADCAST,MULTICAST>  mtu 1500
        ether c2:9a:e0:54:d2:1e  txqueuelen 1000  (Ethernet)
        RX packets 0  bytes 0 (0.0 B)
        RX errors 0  dropped 0  overruns 0  frame 0
        TX packets 0  bytes 0 (0.0 B)
        TX errors 0  dropped 0 overruns 0  carrier 0  collisions 0

enp23s0v1: flags=4098<BROADCAST,MULTICAST>  mtu 1500
        ether c6:9b:25:6e:9a:cc  txqueuelen 1000  (Ethernet)
        RX packets 0  bytes 0 (0.0 B)
        RX errors 0  dropped 0  overruns 0  frame 0
        TX packets 0  bytes 0 (0.0 B)
        TX errors 0  dropped 0 overruns 0  carrier 0  collisions 0

enp23s0v2: flags=4098<BROADCAST,MULTICAST>  mtu 1500
        ether e6:81:40:a9:76:23  txqueuelen 1000  (Ethernet)
        RX packets 0  bytes 0 (0.0 B)
        RX errors 0  dropped 0  overruns 0  frame 0
        TX packets 0  bytes 0 (0.0 B)
        TX errors 0  dropped 0 overruns 0  carrier 0  collisions 0

enp23s0v3: flags=4098<BROADCAST,MULTICAST>  mtu 1500
        ether ce:46:5f:3a:c6:22  txqueuelen 1000  (Ethernet)
        RX packets 0  bytes 0 (0.0 B)
        RX errors 0  dropped 0  overruns 0  frame 0
        TX packets 0  bytes 0 (0.0 B)
        TX errors 0  dropped 0 overruns 0  carrier 0  collisions 0

enp23s0v4: flags=4098<BROADCAST,MULTICAST>  mtu 1500
        ether ba:43:47:85:f2:36  txqueuelen 1000  (Ethernet)
        RX packets 0  bytes 0 (0.0 B)
        RX errors 0  dropped 0  overruns 0  frame 0
        TX packets 0  bytes 0 (0.0 B)
        TX errors 0  dropped 0 overruns 0  carrier 0  collisions 0

enp23s0v5: flags=4098<BROADCAST,MULTICAST>  mtu 1500
        ether 7a:76:61:3e:45:f3  txqueuelen 1000  (Ethernet)
        RX packets 0  bytes 0 (0.0 B)
        RX errors 0  dropped 0  overruns 0  frame 0
        TX packets 0  bytes 0 (0.0 B)
        TX errors 0  dropped 0 overruns 0  carrier 0  collisions 0

enp23s0v6: flags=4098<BROADCAST,MULTICAST>  mtu 1500
        ether 1e:e3:43:8b:8e:75  txqueuelen 1000  (Ethernet)
        RX packets 0  bytes 0 (0.0 B)
        RX errors 0  dropped 0  overruns 0  frame 0
        TX packets 0  bytes 0 (0.0 B)
        TX errors 0  dropped 0 overruns 0  carrier 0  collisions 0

enp23s0v7: flags=4098<BROADCAST,MULTICAST>  mtu 1500
        ether 66:af:66:34:a1:34  txqueuelen 1000  (Ethernet)
        RX packets 0  bytes 0 (0.0 B)
        RX errors 0  dropped 0  overruns 0  frame 0
        TX packets 0  bytes 0 (0.0 B)
        TX errors 0  dropped 0 overruns 0  carrier 0  collisions 0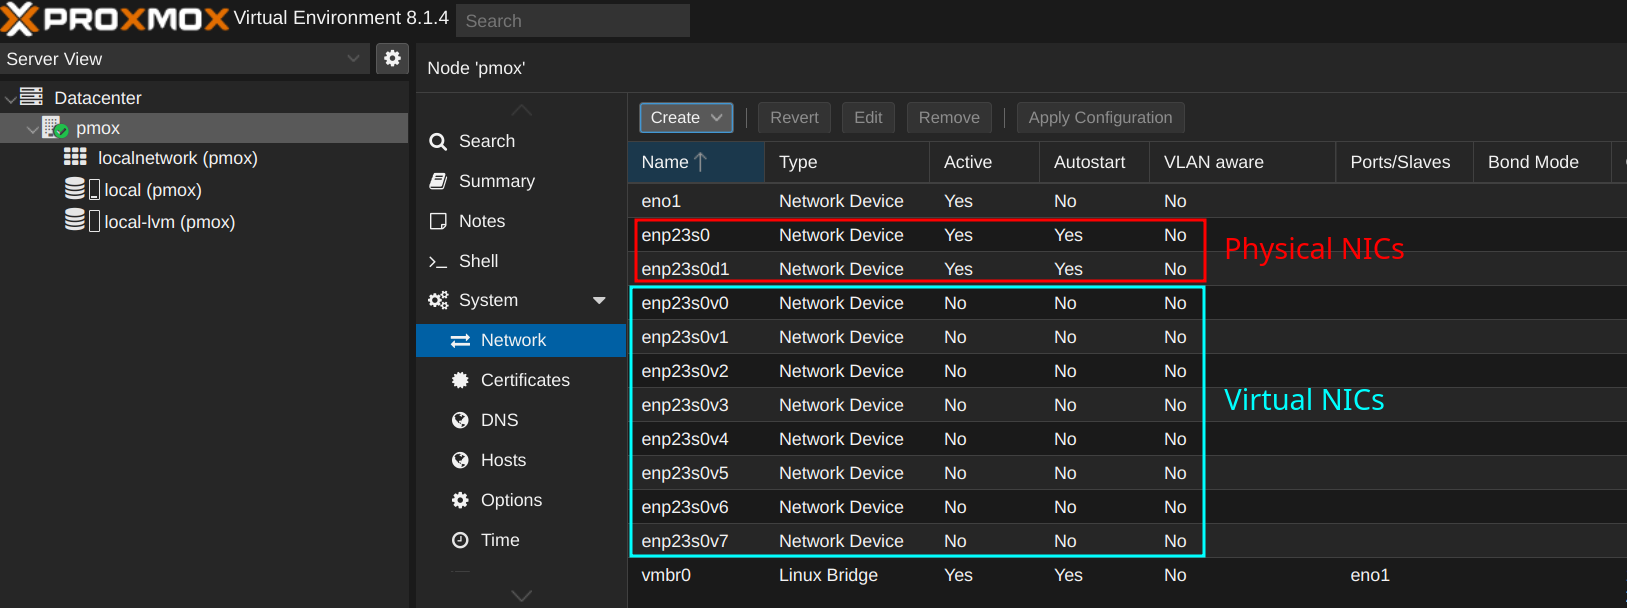
Special Mention
Thank you Stephen Finucane for your guides on how to setup a Mellanox card. However, I had to fact check about the mlx4 configuration. It turned out that you had mixed the documentation for single port and dual port setup.