
Proxmox VE Setup Part 1: Preparation and Installation
How-To: Proxmox VE part 1

Monday 17th February 2025
This is the start of a series of posts about setting up Proxmox VE.
About Proxmox VE

Proxmox VE = Virtual Environment, is an Open Source alternative to VMWare ESXi. It is used for VM and container management. The reason I need to add “VE” is because Proxmox have other kinds of products, like Backup Server and Mail Gateway.
Some key points:
The Hypervisor technology is based on Linux KVM. Anyone with experience with Linux KVM knows that it is not so user friendly to work with; it’s all command-line. Proxmox makes it much easier to manage VM’s.
The underlying OS is Linux Debian.
Proxmox VE supports Hyperconverged Setup to combine network, compute and storage into a single cluster. This technology used to only be available in homogeneous data centers on expensive hardware, but can now be configured for any commodity hardware (I would still recommend using one type of hardware per cluster).
The Proxmox community version is totally free. If you want the stable version and professional support however, you need to purchase a license.
Install Preparations
Installing Proxmox VE is quick and easy, but you may end up having to re-do it a few times if you don’t plan ahead how you are going to design your network and storage setup (I have done it 3 times so far).
High-Level Design
I want to create something where I can host virtual machines for customers, and put their VM’s in groups so they cannot communicate directly to other customers. Kinda like a VPS. This is the High-Level Design:

Explanation:
To start with the bottom: Proxmox VE runs on my gaming computer that I made into a server. I don’t have a 3-node server cluster (yet) to test out Ceph. For building a POC, it will do fine.
My Synology NAS is providing an iSCSI Storage pool that I use for VM’s that require an extra amount of storage. I can also use it to store snapshots.
Advancing to the 1st layer of virtualization: Normally, I would create one VM for each type of application; Internal, Management and Public. But since Linux supports VRF = Virtual Routing and Forwarding, I figured I could run all the containers from a single server instead. Just note that I don’t know if this is a good security practice, to mix public services with internal services. But since the routing tables are separated, and all the services are running inside containers, I don’t see any immediate harm in doing that.
In the 2nd Layer of virtualization are the containers. Most services today can run inside a container, so there is not much need to create more than one VM, other than for high-availability and load-balancing reasons. The containers get assigned to the appropriate network segment, depending what type of service it is.
Network Requirements
I’m going to talk more in-deph about both network and storage setup in upcoming parts but for the planning purpose, I recommend following network adapters:
One Network Adapter for OOBM = Out of Band Management. This can be used to access the Proxmox CLI or WebUI, and to install updates.
One or preferably two bonded high-speed network adapters for Storage and VM traffic.
You could even add an additional bond to separate VM and Storage traffic. It might be necessary if your storage network is isolated on it’s own switches.
The IPMI adapter, if you server has one. This makes it possible to do server maintenance remotely, like changing UEFI/BIOS settings. Other names for these types of interfaces are iLO or iDRAC.

Note: If you are planning to install a cluster, you will need even more adapters. I would suggest reading the Proxmox Ceph Cluster documentation for a recommended setup.
Storage Requirements
Depending what you have access to, different storage designs are available.
Ideally, I would build a 3-node Ceph Cluster (or more) with high-speed storage. Then I would create separate partitions for:
Boot partition and root directory
Containers and VM Storage
ISO storage
But I don’t have that. What I do have is a custom built gaming computer and a NAS. My storage design is therefore:
x2 SATA SSDs with 500GB each*, configured as RAID 1. These drives are used for the boot partition and the root directory (configured in initial setup)
x2 NVME SSDs with 1TB each, configured as RAID 1. These drives contains the primary disks of the VMs.
An iSCSI link to my NAS. This is used for secondary VM disks to store alot of data in certain directories.
One 2TB HDD for storage of ISO images and other non-critical data. It’s not entirely necessary, but it was there, so I might as well use it for something.
Note: I was considering if I really needed redundancy for the root partition. As long as the VM disks are on a separate disk, In theory I can reinstall Proxmox VE on an new drive and it should be able to detect the existing VMs. But I think I will sleep better if everything is redundant.
The setup of these storage units will be covered in part 3. For now, the most important thing is that if you are going to use RAID on the boot partition, you better prepare for that before you begin installing Proxmox VE. The other disks can be added whenever.
Installing Proxmox
Pre-Installation tasks
Create a bootable USB
Go to the Proxmox website and download the latest ISO image. Create a bootable USB using for example Balena Etcher. Install instructions for various OSes can be found on Github.
Note: How to create a bootable USB with Balena Etcher needs no explanation. It’s basically 1, 2, 3 done.
UEFI BIOS Settings
For virtualization functions to work properly, these functions should be enabled in UEFI BIOS:
Virtualization - Quite obvious one
VT-d - Enables VMs to interact with PCI devices directly.
Intel VT-d makes direct access to a PCI device possible for guest systems with the help of the Input/Output Memory Management Unit (IOMMU) provided.
Source: https://www.thomas-krenn.com/en/wiki/Overview_of_the_Intel_VT_Virtualization_Features
Most modern motherboards today supports these features, even in regular consumer hardware. Finding them however, especially the VT-d option, can be a challenge. On Asus ROG Strix X299 for example, VT-d is located under Advanced > System Agent (SA) Configuration.

Installing Proxmox VE
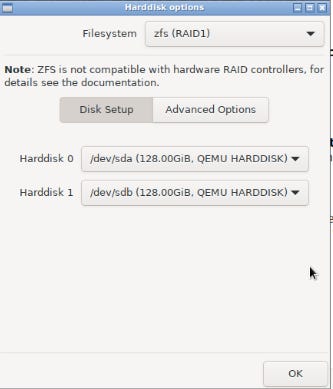
Installing Proxmox VE is no harder than installing any other Linux OS. Just follow the install wizard. The only consideration is the storage options. If you are going to use a RAID option, click Options and choose the appropriate filesystem.
Post Installation tasks
A few things before we wrap up…
Change the repository setting to No-Subscription
Assuming you are running the free version, you need to edit the repository settings to be able to download updates.
Go to node_name > Updates > Repositories. Click Add > No-Subscription.

Update 18.02.2025: You also have to disable the enterprise repositories. Otherwise you get this error when running apt update:
E: Failed to fetch https://enterprise.proxmox.com/debian/ceph-quincy/dists/bookworm/InRelease  401  Unauthorized [IP: 2a01:7e0:0:424::249 443]
E: The repository 'https://enterprise.proxmox.com/debian/ceph-quincy bookworm InRelease' is not signed.
N: Updating from such a repository can't be done securely, and is therefore disabled by default.
N: See apt-secure(8) manpage for repository creation and user configuration details.
Enable IOMMU
IOMMU is required for PCI pass-through virtualization (VT-d) to work.
Login to the CLI, either through SSH or navigate to node_name > Shell, and edit following file:
nano /etc/default/grub
On the row starting with GRUB_CMDLINE_LINUX_DEFAULT, add intel_iommu=on after quiet
# If you change this file, run 'update-grub' afterwards to update
# /boot/grub/grub.cfg.
# For full documentation of the options in this file, see:
#   info -f grub -n 'Simple configuration'

GRUB_DEFAULT=0
GRUB_TIMEOUT=5
GRUB_DISTRIBUTOR=`lsb_release -i -s 2> /dev/null || echo Debian`
GRUB_CMDLINE_LINUX_DEFAULT="quiet intel_iommu=on iommu=pt"
GRUB_CMDLINE_LINUX=""
Note: If you have AMD processor, you type amd_iommu=on
Update grub and initramfs:
update-grub
update-initramfs -u
Then reboot.
And that concludes Part 1. Next part will look at network configuration.