SSH: Generate a ED25519 security key keypair to use with U2F Authentication
How-To: SSH / Yubikey
13th November 2023
Updated 22nd November 2023
ED25519 is probably one of the best cryptographic algorithms that is publicly available. I first saw it used in Protonmail and my opinion is that it should be used whenever possible. OpenSSL, which is used to generate certificates for webservers, supports ED25519 certificates, but as far as i know, no common webbrowser does yet. It might not be practical with ED25519 SSL certificates for now, but very useful for other things, like SSH for example.
Note: Here is a list of things that support the ED25519 algorithm:
https://ianix.com/pub/ed25519-deployment.html
U2F Authenticators are hardware keys that supports the FIDO protocol, like a Yubikey or Solokey. I recommend to read my blog on it if you are not familiar. Since OpenSSH 8.2, U2F authentication has been supported.
SSH with U2F Authentication using ED25519 as keypair
Following is an example on how to generate an ED25519 keypair with OpenSSH, then use the Yubikey for U2F FIDO authentication.
Prerequisites
Install some FIDO2 middleware
$ sudo apt install libfido2-1 libfido2-dev libfido2-doc fido2-toolsGenerate a ED25519 keypair with OpenSSH on Linux
Note: minimun OpenSSH version is 8.2. To check OpenSSH version:
$ ssh -V
To generate the ED25519 security key keypair, enter this command while having your key connected:
$ ssh-keygen -t ed25519-sk -C "$(hostname)-$(date +'%d-%m-%Y')-XXXXXXX"
Note: Replace XXXXXX for the serial number of the Yubikey. You can get it with the command ykman list if you have the Yubikey Manager installed.
user@workstation~$ ssh-keygen -t ed25519-sk -C "$(hostname)-$(date +'%d-%m-%Y')-XXXXXXXX"
Generating public/private ed25519-sk key pair.
You may need to touch your authenticator to authorize key generation.
Enter PIN for authenticator:
You may need to touch your authenticator (again) to authorize key generation.
Enter file in which to save the key (/home/user/.ssh/id_ed25519_sk):
Enter passphrase (empty for no passphrase):
Enter same passphrase again:
Your identification has been saved in /home/user/.ssh/id_ed25519_sk
Your public key has been saved in /home/user/.ssh/id_ed25519_sk.pub
The key fingerprint is:
SHA256:WfxE6szm63GeW4a26Y74S+KxX0QWK+9DDmdlLrlMdEU workstation.bastuklubben.online-26-10-2023-XXXXXXXX
The key's randomart image is:
+[ED25519-SK 256]-+
|            o  .E|
|         . o o . |
|          = * +  |
|         * O *   |
|        S * @ .  |
|         o @ +   |
|        o + @ o  |
|       . * O B   |
|        ++B+O.   |
+----[SHA256]-----+
A private key and a public key will be stored under ~.ssh. At first I was considering storing the private-key on the Yubikey itself, but then it wouldn’t be true 2-factor authentication, since both the private key and the U2F token are on the same hardware.
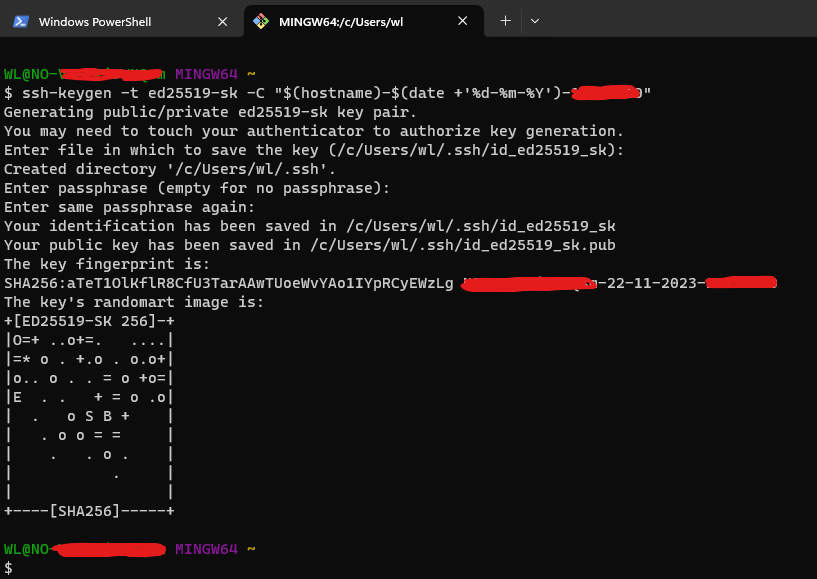
Update: Generate a ED25519 keypair with OpenSSH on Windows
On Windows it turned out to be more complicated. WSL = Windows Subsystem for Linux turned out not working because it didn’t see the USB device.
The solution was to download Git for Windows
Note: there was a second tool on github, but I never installed it, called OpenSSH SK Winhello. You might want to check that out if you can’t get it working.
Then you can generate an ED25519-SK key using MINGW64:
Add your public key on the server
Task 1: If not already done; on the SSH Server, edit /etc/ssh/sshd_config and uncomment / add following:
Server~$ sudo nano /etc/ssh/sshd_config
PubkeyAuthentication yes
AuthorizedKeysFile      .ssh/authorized_keys
PubkeyAcceptedKeyTypes  sk-ecdsa-sha2-nistp256@openssh.com,sk-ssh-ed25519@openssh.com
Note: PubkeyAcceptedKeyTypes is filtering down to only accept ECDSA and ED25519 keys and is optional.
Task 2: Copy the contents of the public key (stored by default under $HOME/.ssh/) to desired SSH Servers $HOME/.ssh/authorized_keys
Workstation~/.ssh/$ cat id_ed25519_sk.pub
sk-ssh-ed25519@openssh.com AAAAGnNrLXNzaC1lZDI1NTE5QG9wZW5zc2guY29tAAAAIP8MUkTClymyZji5YnE7tovIezYzj3pGVIeSk8k+NMHyAAAABHNzaDo= workstation.bastuklubben.online-26-10-2023-XXXXXXXX
You may have to create the .ssh directory and the authorized_keys file:
Server~$ mkdir .ssh
Server~$ nano .ssh/authorized_keys
sk-ssh-ed25519@openssh.com AAAAGnNrLXNzaC1lZDI1NTE5QG9wZW5zc2guY29tAAAAIP8MUkTClymyZji5YnE7tovIezYzj3pGVIeSk8k+NMHyAAAABHNzaDo= workstation.bastuklubben.online-26-10-2023-XXXXXXXXNote: it’s all on the same row
Task 3: Modify the privileges for the .ssh folder to only be readable by you:
Server~$ sudo chmod -R 700 .ssh
Server~$ sudo chmod 600 .ssh/authorized_keys
Verification
Verify by SSH to the remote server:
user@workstation:~$ ssh pub.bastuklubben.online
Confirm user presence for key ED25519-SK SHA256:fOzRELP1GWBGmAHK3GPwLEe7AbNw/ADzuwjZug7DTQw
User presence confirmed
Welcome to Ubuntu 22.04.3 LTS (GNU/Linux 5.15.0-87-generic x86_64)
...
Troubleshoot
If it keeps asking for password, check that the privileges is setup correctly.
Source: https://serverfault.com/questions/396935/ssh-keys-authentication-keeps-asking-for-password
Appendix
Setting up an additional key
Redundancy is always nice. However it seems like there is no flexible way to use multiple hardware keys:
the SSH command is dependent on the private-key filename being the default one (id_ed25519_sk)
You can make a custom config to specify another key, but still only one key can be specified.
There is simply no way to just switch between two yubikeys and expect that the SSH command will work without any additional parameters.
Therefore, the best approach is to generate an additional key and treat it as a backup key. You can then rename the backup key to the default name if your primary key gets lost, stolen or compromised.
user@workstation:~/.ssh$ ssh-keygen -t ed25519-sk -C "$(hostname)-$(date +'%d-%m-%Y')-20137020"
Generating public/private ed25519-sk key pair.
You may need to touch your authenticator to authorize key generation.
Enter PIN for authenticator:
You may need to touch your authenticator (again) to authorize key generation.
Enter file in which to save the key (/home/user/.ssh/id_ed25519_sk): /home/user/.ssh/id_ed25519_sk_5CNano
Enter passphrase (empty for no passphrase):
Enter same passphrase again:
Your identification has been saved in /home/user/.ssh/id_ed25519_sk_5CNano
Your public key has been saved in /home/user/.ssh/id_ed25519_sk_5CNano.pub
The key fingerprint is:
SHA256:EkYj2Bm+mvWIAadkyBqNC8DnTyoxrL2ANtkeTK9wDWk workstation.bastuklubben.online-31-10-2023-20137020
The key's randomart image is:
+[ED25519-SK 256]-+
|o  oooo          |
|++.ooo .         |
|B+= o o          |
|=X E + .         |
|*.X X . S        |
|+*.% * .         |
|..X.+ .          |
|  .o             |
|                 |
+----[SHA256]-----+
At least you can add both keys in the servers authorized_keys file.
user@server:~/.ssh$ cat authorized_keys
sk-ssh-ed25519@openssh.com AAAAGnNrLXNzaC1lZDI1NTE5QG9wZW5zc2guY29tAAAAIP8MUkTClymyZji5YnE7tovIezYzj3pGVIeSk8k+NMHyAAAABHNzaDo= workstation.bastuklubben.online-26-10-2023-20657612
sk-ssh-ed25519@openssh.com AAAAGnNrLXNzaC1lZDI1NTE5QG9wZW5zc2guY29tAAAAIKq+0icXCy9vJasfaok6TDw7Z7aWQsMb8sfp6K/7AMgUAAAABHNzaDo= workstation.bastuklubben.online-31-10-2023-20137020
You can verify that the backup key works by specifying the private key file in the SSH command:
user@workstation:~/.ssh$ ssh -i ~/.ssh/id_ed25519_sk_5CNano server.bastuklubben.online
Confirm user presence for key ED25519-SK SHA256:UhRFIrgV4YE0tEW4Dw+S08xQMWX0uE2JIYN9sKmn68g
User presence confirmed
Welcome to Ubuntu 22.04.3 LTS (GNU/Linux 5.15.0-87-generic x86_64)
...
Source: https://developers.yubico.com/SSH/Securing_SSH_with_FIDO2.html
Require U2F Verification
By default the server only requires the user to authenticate by touching the hardware key. The server can be configured to require user verification by entering PIN, password or using biometrics. This is done by adding PubkeyAuthOptions verify-required to /etc/ssh/sshd_config:
...
# Added to the end of the file:
PubkeyAuthOptions       verify-required
Note: By default it is using password.
Source: https://developers.yubico.com/SSH/Securing_SSH_with_FIDO2.html
Special Mention
Thank you Jeroen van Kessel for your excellent blogs regarding SSH, U2F and ED25519.


