
Wireguard: Setup WG-Easy with docker compose
How-To: Wireguard Server setup

Monday 27th October 2025
Wireguard is a famous secure open source Client-Server VPN solution. WireGuard uses an up-to-date encryption suite: ChaCha20, Curve25519, Blake2s, and Poly1305. It’s known for it’s speed and effiency. It’s probably used as the underlying application for many VPN providers today.
Design
Setting up Wireguard with Docker is pretty easy as long as you don’t step outside the boundaries. If you have special requirements, good luck! I had a grand vision with split tunneling and users would be connected to an interface outside docker but that is for another time.
Right now I’m doing full tunneling of all traffic toward the wireguard container. From there the client has access to all my internal services.
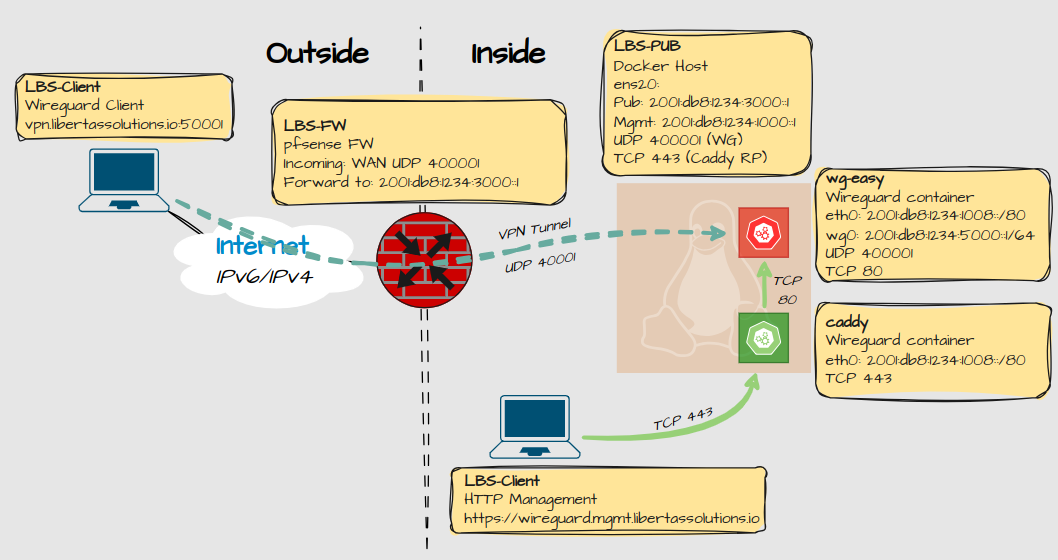
For management of the wireguard container, HTTPS traffic goes through a caddy container and is then proxied to the wireguard container.
“Hey… didn’t you say you migrated from docker to podman?” Well yeah, but I noticed that some applications are written to fit with podman, and some with docker, so I run both on different hosts. Even if Podman is more secure, Docker is just so much simpler in this case. But if you want to try to setup Wireguard with podman, there is a guide for that. The problem for me was that it became to complex when I had to setup the reverse-proxy.
Prerequisites
This has to be in order:
UDP Port 51820 (or whatever port you decide to use) needs to be forwarded through the firewall. Read the appendix on how to port forward on pfSense, because that is what I use.
Dynamic DNS is optional, but recommended.
DNS entries for reverse-proxy to work. Either if you use a DNS server or local records on your workstation.
Docker is installed. I recommend following the guides by docker for optimal setup.
Configuration
Setup Caddy for reverse-proxy
The wireguard UI doesn’t have HTTPS. Caddy is a good way to enable a HTTPS to reach the container. For the caddy container you only need two files:
compose.yml:
services:
    caddy:
        container_name: caddy
        image: caddy:2.10.0-alpine
        # publish everything you deem necessary
        ports:
#            - ‘80:80/tcp’
            - ‘443:443/tcp’
#            - ‘443:443/udp’
        networks:
            - caddy-mgmt-network
        restart: unless-stopped
        volumes:
            - ‘./Caddyfile:/etc/caddy/Caddyfile:ro’
            - config:/config
            - data:/data

networks:
    caddy-mgmt-network:
        name: caddy-mgmt-network
        enable_ipv6: true
        driver: bridge
        attachable: true
        ipam:
            config:
                - subnet: “100.101.1.0/24”
                  gateway: “100.101.1.1”
                - subnet: “2001:db8:1234:1008:1::/80”
                  gateway: “2001:db8:1234:1008:1::1”

volumes:
    config:
    data:
Caddyfile:
services:
    caddy:
        container_name: caddy
        image: caddy:2.10.0-alpine
        # publish everything you deem necessary
        ports:
#            - ‘80:80/tcp’
            - ‘443:443/tcp’
#            - ‘443:443/udp’
        networks:
            - caddy-mgmt-network
        restart: unless-stopped
        volumes:
            - ‘./Caddyfile:/etc/caddy/Caddyfile:ro’
            - config:/config
            - data:/data

networks:
    caddy-mgmt-network:
        name: caddy-mgmt-network
        enable_ipv6: true
        driver: bridge
        attachable: true
        ipam:
            config:
                - subnet: “100.101.1.0/24”
                  gateway: “100.101.1.1”
                - subnet: “2001:db8:1234:1008:1::/80”
                  gateway: “2001:db8:1234:1008:1::1”

volumes:
    config:
    data:
Source: https://wg-easy.github.io/wg-easy/latest/examples/tutorials/caddy/
Then run docker compose up -d
Setup the WG-Easy container
wg-easy is a well-maintained container project with a great UI for management.
compose.yml:
volumes:
  etc_wireguard:

services:
  wg-easy:
    environment:
    #  Optional:
      - PORT=80
    #  - HOST=0.0.0.0
    #  - INSECURE=false

    image: ghcr.io/wg-easy/wg-easy:15
    container_name: wg-easy
    networks:
      caddy-mgmt-network:
    volumes:
      - etc_wireguard:/etc/wireguard
      - /lib/modules:/lib/modules:ro
    ports:
      - “40001:40001/udp”
    restart: unless-stopped
    cap_add:
      - NET_ADMIN
      - SYS_MODULE
      # - NET_RAW # ⚠️ Uncomment if using Podman
    sysctls:
      - net.ipv4.ip_forward=1
      - net.ipv4.conf.all.src_valid_mark=1
      - net.ipv6.conf.all.disable_ipv6=0
      - net.ipv6.conf.all.forwarding=1
      - net.ipv6.conf.default.forwarding=1

networks:
  caddy-mgmt-network:
    name: caddy-mgmt-network
    external: true
Notice that the network is the same as the one defined in the caddy container.
Source: https://github.com/wg-easy/wg-easy/blob/master/docker-compose.yml
Then run docker compose up -d
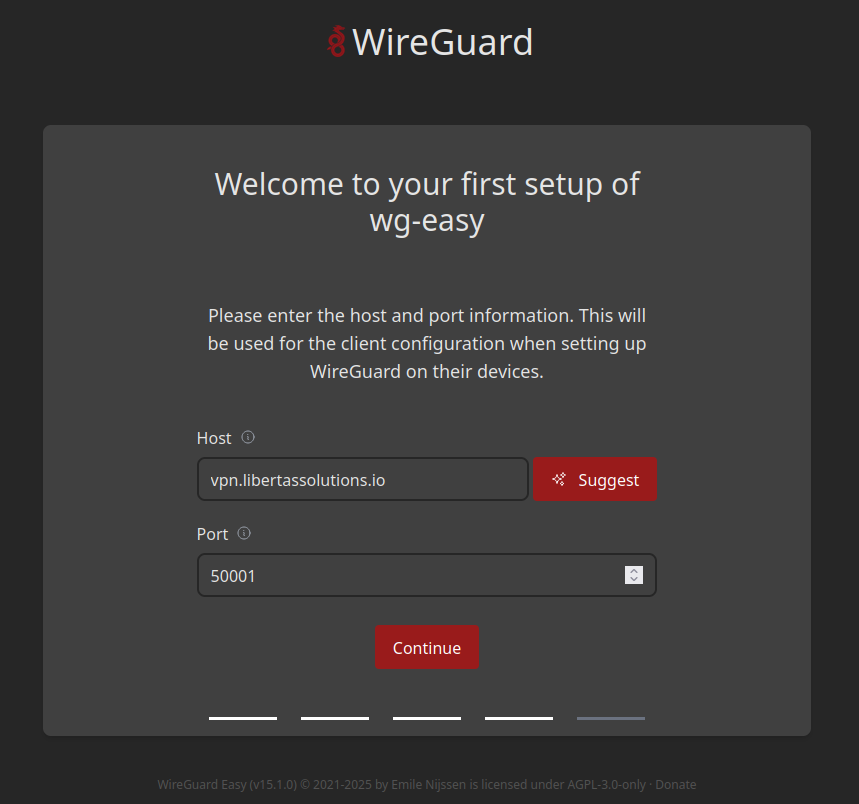
Initial Setup
Once the container have started, you get to set username/password and some other initial settings like hostname and port number. It’s very self explanatory.
Adjusting some settings
Some settings you might want to adjust afterwards. Navigate to the Admin Panel by clicking on Administrator up in the corner.
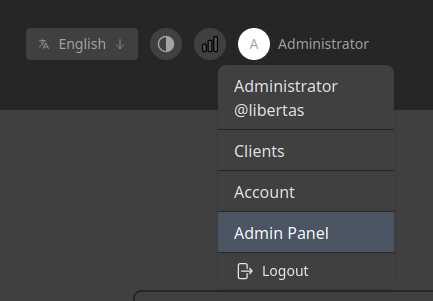
From there you can set:
General - Change the password.
Config - Default Configuration for clients; you can set custom DNS server and modify allowed IP’s and port number.
Interface - change the default CIDR allocation, MTU and port number of the server. Should match what you set on the Config page.
Under Hooks there are some special rules for iptables and ip6tables to enable forwarding for clients. These settings should work out of the box and don’t need to be modified, even if you are running iptables on your host. I’m just telling you that in case an AI says otherwise…
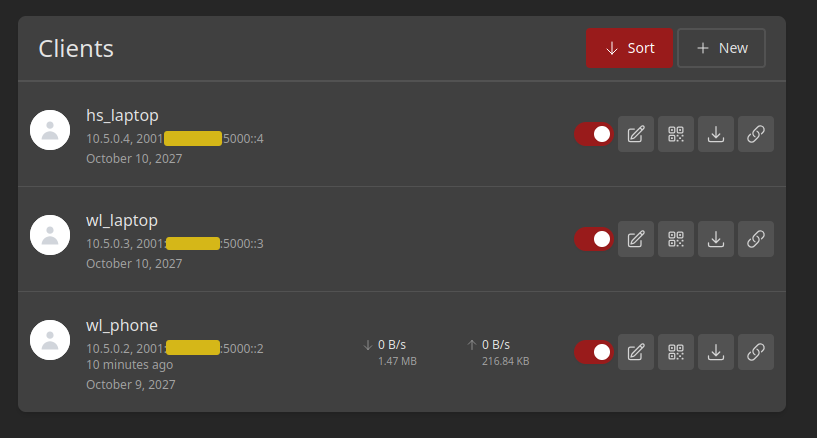
Configure Clients
Navigate to Clients
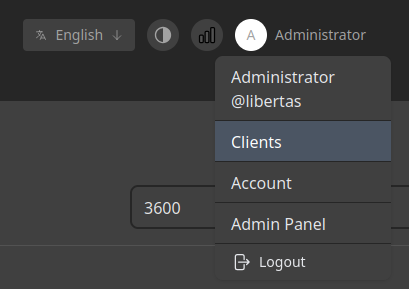
Click + New, add a name and expiry date and you’re done. To be honest I expected that I would need to setup an LDAP connection but nope, very simple.
Appendix
Port-forwarding on the pfSense Firewall
Port-forwarding on pfsense is quite straight forward and you can do it for both IPv4 and IPv6. Navigate to Firewall > NAT
Interface: WAN
Address-Family: IPv4/IPv6 (make seperate rules for both)
Destination port range:
From Port: 51820 (default)
To Port: 51820
Redirect target:
Address: “IP to server”
Redirect Target Port: 51820
Firewall Rules will be created automatically.

Note: As you can see I’m using a non-default port because it was overlapping with one of my other rules. That took me hours to figure out so watch out for that.