
Website hosting Part 2: Deploying a Wordpress Application with Docker Compose
How-To: Docker Compose

Thursday 10th July 2025
In the last article I described all the preparations that needs to be in order for to running multiple websites from one single public IP. Now I can install a Wordpress application, or any other website builder for that matter.
The Wordpress deployment is based on Damalis work on github.
Source: https://github.com/damalis/full-stack-apache2-wordpress-for-everyone-with-docker-compose/tree/main
The script is of great help as it includes a lot of extra services to optimize the Wordpress application. I did however make some changes in the docker-compose.yml:
I removed all the “link” parameters;
Changed the network driver from “none” to “bridge”;
removed some unnecessary port exposures (I only need to export 80 and 443 from the apache webserver container) and;
changed to only use one network instead of two
I decided to create a fork with those changes:
Installing the script
Preparations
After pulling the project from github, there are two things to consider:
Adjust the Docker Compose file
You may have to adjust the docker-compose.yml file to your environmnent. I can’t write a file that will fit everyone. For example, I personally use specific IP addresses when exposing port 80 and 443 from the webserver container:
$ nano docker-compose.yml
------------------------------------------------------------------------
services:
   ...
     webserver:
        ...
        ports:
            - '[2001:DB8:1234:3001::1]:10080:80'
            - '[2001:DB8:1234:3001::1]:10443:443'
#            - '90:90'
I also manually set the ip subnets. You don’t have to do this but I like to have control on which subnets I use:
networks:
    wordpress-network:
        enable_ipv6: true
        driver: bridge
#        driver_opts:
#            com.docker.network.enable_ipv4: "false"
        ipam:
            config:
                - subnet: 2001:DB8:1234:3008::/80
                  gateway: 2001:DB8:1234:3008::1
                - subnet: 100.103.0.0/24
                  gateway: 100.103.0.1
Note: I dare not disable IPv4 right now because I don’t know if something will break.
Adjust the domains for Let’s Encrypt
The SSL snippet used by certbot to issue cert requests includes “www.your.domain” you may want to remove that from the install script if you don’t use that:
$ nano install.sh
------------------------------------------------------------------------
...
else
        ssl_snippet="certbot certonly --webroot --webroot-path \/tmp\/acme-challenge --rsa-key-size 4096 --non-interactive --agree-tos --no-eff-email --force-renewal --email \$\{LETSENCRYPT_EMAIL\} -d \$\{DOMAIN_NAME\}">
fi
...
After that you can start reading the install instructions from github.
Notes on the install script
When running the “install.sh” script:
When asked about the domain name, it is the FQDN = fully qualified domain name of the host. That may or may not include subdomains depending on your setup.
Otherwise it’s actually not much to say. Apart from struggling a bit with the certbot container, which wasn’t any fault of the script but caused by external factors, everything just works. I imported a whole website without having to tweak any upload settings or activate additional php plugins. It just works… Amazing!
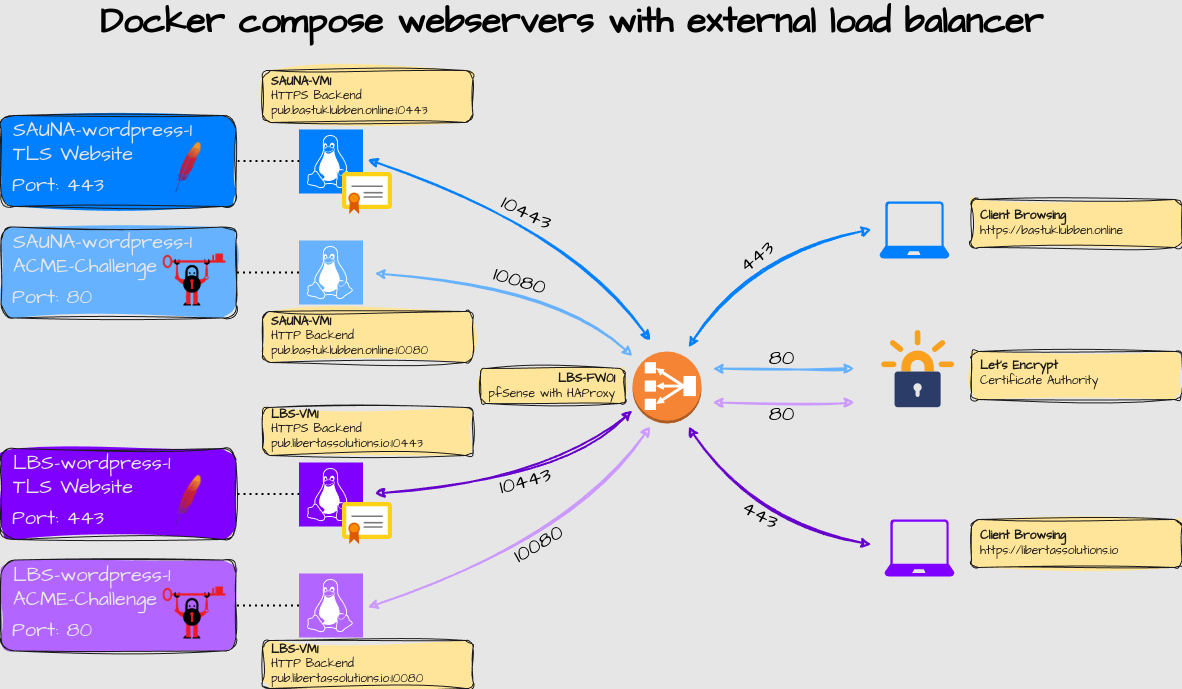
Now if you go to http://bastuklubben.online or http://libertassolutions.io you will be proxied by my firewall, and redirected towards the wordpress container backends with HTTPS.
Special Mentions
Thank you Damalis for sharing your wordpress container application with the world! You are awesome!
Appendix
Certbot Troubleshooting
If you see the “Authorization failed” when running “docker compose logs certbot”, it can be one of the following causes:
Port number or address is misconfigured in the docker-compose.yml file. If you are using a reverse-proxy, make sure the reverse proxy settings matches with the compose file
There is no public A or AAAA record for this domain. Make sure the domain is correctly entered and that the DNS provider has a A/AAAA record set to the correct IP.
If you see a certbot authentication failure due to “connection”, it could be a routing issue. Make sure the source address is reachable from the outside.