
Rustdesk Remote Desktop
How-To: Rustdesk Installation

Many of you have probably at some point used an application to control a users desktop remotely. Or perhaps you are the one that has been controlled. Probably the most popular application for remote desktop control on the market is Teamviewer. It used to be free but that seems to have changed. One thing that concerns me: Teamviewer uses their own central server; What happens to all the data being sent between clients? Can someone else be monitoring your activity? I don’t know and I rather avoid the risk if I can.
Rustdesk is a free open source Remote Desktop alternative to Teamviewer that can be self-hosted. The configuration of it is fairly simple compared to other applications.
Install Rustdesk Server
You can run a Rustdesk server on a workstation or a sentral server, as long as you have docker installed.
Firewall openings
Following ports needs to be forwarded thorugh the firewall:
TCP 21114-21119UDP 21116
The above 21115-21117 are the minimum required ports for RustDesk to work. These handle the signal and relay ports as well as NAT traversal.
Additionally TCP ports 21118 and 21119 can be opened if you want to use the RustDesk Web Client.
For Pro users without an SSL Proxy you will need to open TCP port 21114 for the API to work alternatively using an SSL Proxy open TCP port 443.
Source: https://rustdesk.com/docs/en/self-host/

Note: Rustdesk supports both IPv6 and IPv4. However, I’m running IPv6 only.
Dependencies
Following Dependencies are needed:
sudo apt install docker.io docker-compose python3-pip curl git vim nano zram-tools -yNote: above are dependencies for a Debian Server. On an Ubuntu Server, the “zram-tools” can be substituted with “zram-config”.
Install Rustdesk Server on Ubuntu/Debian
One assumption is that docker and docker compose are already installed. If not, here are the official instructions on how to install it:
Docker Compose file
Recommended Central Server setup
I’m running rustdesk on a dedicated server. I have modified the network type to fit my environment. Here is my Docker Compose file:
services:
  hbbs:
    container_name: hbbs
    image: rustdesk/rustdesk-server:latest
    command: hbbs
    volumes:
      - ./data:/root
    depends_on:
      - hbbr
    restart: always
    networks:
      - rustdesk-network
    ports:
      - '[2001:db8:1234:3001::1]:21114:21114'
      - '[2001:db8:1234:3001::1]:21115:21115'
      - '[2001:db8:1234:3001::1]:21116:21116'
      - '[2001:db8:1234:3001::1]:21116:21116/udp'
      - '[2001:db8:1234:3001::1]:21118:21118'
      - '[10.3.0.1]:21114:21114'
      - '[10.3.0.1]:21115:21115'
      - '[10.3.0.1]:21116:21116'
      - '[10.3.0.1]:21116:21116/udp'
      - '[10.3.0.1]:21118:21118'

  hbbr:
    container_name: hbbr
    image: rustdesk/rustdesk-server:latest
    command: hbbr
    volumes:
      - ./data:/root
    restart: always
    networks:
      - rustdesk-network
    ports:
      - '[2001:db8:1234:3001::1]:21117:21117'
      - '[2001:db8:1234:3001::1]:21119:21119'
      - '[10.3.0.1]:21117:21117'
      - '[10.3.0.1]:21119:21119'

# Just in case you forgot the ports:
# 21114 TCP for web console, only available in Pro version
# 21115 TCP for NAT type test
# 21116 TCP TCP hole punching
# 21116 UDP heartbeat/ID server
# 21117 TCP relay
# 21118/21119 TCP for web socket if you want to run web client

networks:
    rustdesk-network:
        driver: bridge
        driver_opts:
            com.docker.network.enable_ipv4: "false"
        enable_ipv6: true
        ipam:
            config:
                - subnet: 2001:db8:1234:3008:1::/80
                  gateway: 2001:db8:1234:3008:1::1
Explanation:
The port exposures are according to rustdesks documentation:
https://rustdesk.com/docs/en/self-host/rustdesk-server-oss/docker/The data directory under “volumes” will be created automatically
Network IPAM settings are optional.
Recommended Workstation Setup
If you are planning to run the server on a desktop, you can run with the compose file from the official rustdesk documentation:
services:
  hbbs:
    container_name: hbbs
    image: rustdesk/rustdesk-server:latest
    command: hbbs
    volumes:
      - ./data:/root
    network_mode: "host"

    depends_on:
      - hbbr
    restart: unless-stopped

  hbbr:
    container_name: hbbr
    image: rustdesk/rustdesk-server:latest
    command: hbbr
    volumes:
      - ./data:/root
    network_mode: "host"
    restart: unless-stopped
Explanation: The difference is that it’s running “Host” network type instead of “Bridge”.
Install the Rustdesk Client on Linux
Rustdesk is available on multiple OSes but I only cover Linux here.
On a debian-based distribution like Kubuntu, there are more than one alternative:
Install Rustdesk client manually with a .deb file
Install Rustdesk as a flatpak packet
I chose the flatpak approach as it is easier to update with a central repository. You may not have the latest version available but so far it has worked fine.
Configure the client
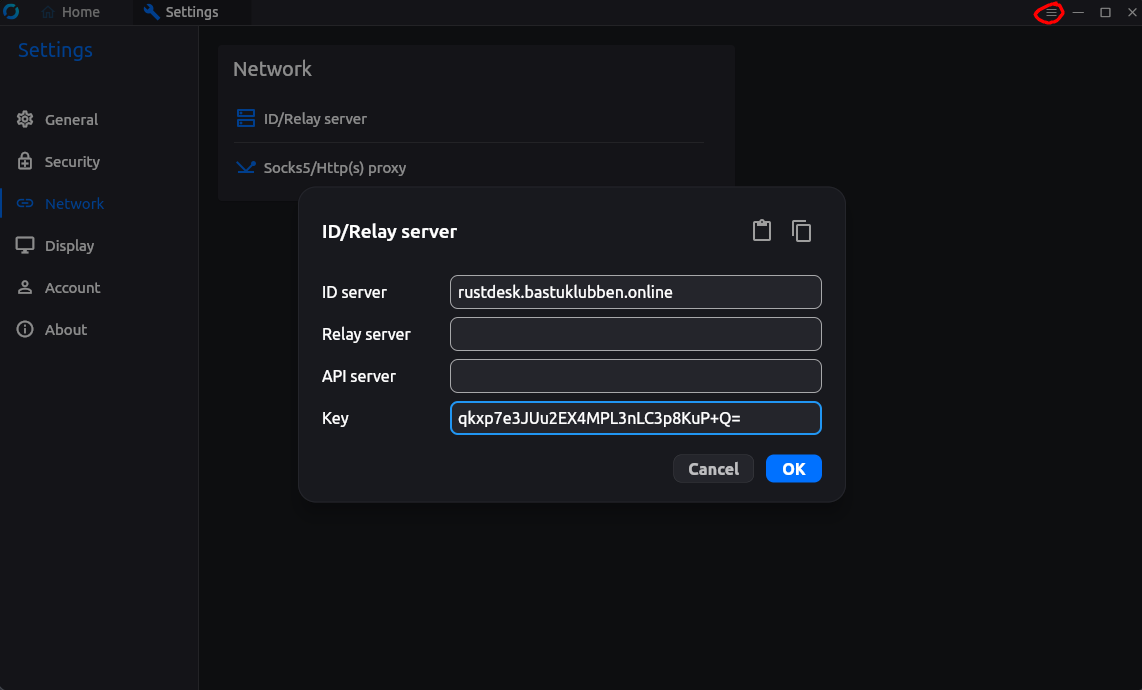
You need to add the server address and the Public Key to authenticate to the server. You can find the public key on the server in the rustdesk-compose-project/data directory:
.../rustdesk/data$ cat id_ed25519.pubThen open the rustdesk client > Settings (the hamburger menu on the top right corner) > Network > ID/Relay Server and enter ID Server and Key:
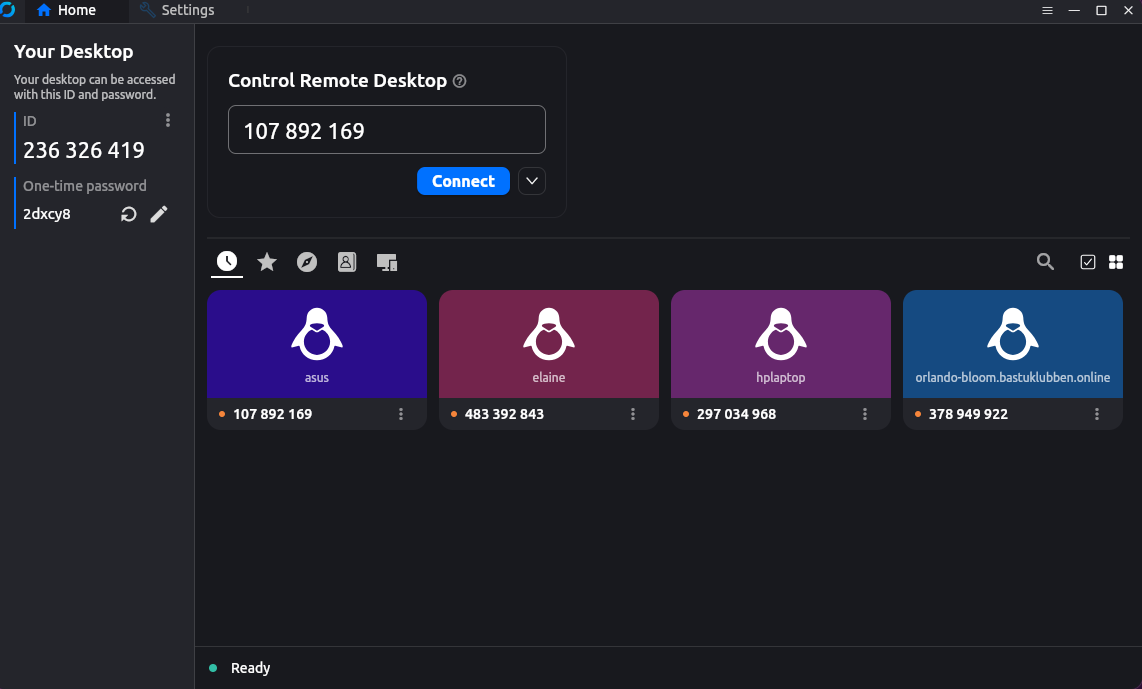
If the server is reachable and everything is setup correctly, on the home tab it should say “Ready” with a green circle in the bottom left corner.
Connecting to another client
Assuming both clients have configured server and key correctly, you can now start connecting to each other the same way as you used to do on Teamviewer:

On the left panel there is information about your ID, that the remote user needs to connect to your computer.
Once connected with the correct ID, the remote user have to enter the one-time password or you can accept the incoming connection.
Maintenence
Remember to update the server once in a while. If the server and the clients versions are too far off, connection issues might occur.
To update the client, simply run “sudo flatpak update” in the terminal
To update the server, you need to stop the container and pull the latest image:
docker compose down
docker compose pull
docker compose up -d
Appendix
When connecting from your local network
When one of the hosts are inside the local network, i.e. from one of the internal zones of your firewall, remember to setup internal DNS records and correct port forwarding between zones.
When running dual-stack, You can get intermittent connection errors when the traffic either uses IPv6 and UDP port 21116 is blocked, or the traffic gets hairpinned over IPv4 if you don’t have an internal DNS record defined.