
Proxmox VE Setup Part 4: Network Storage
How-To: Proxmox Setup Part 4


Monday 17th March 2025
Updated Friday 28th March 2025
In Part 3 I configured the physical drives inside my server. Now I’m going to setup the iSCSI network drive

The NAS configuration
I’m using a Synology DSM as a NAS. I’m not going to cover how to setup a new volume group, just show the relevant iSCSI settings.
Setting up an iSCSI Target in Synology DSM
Step 1: Create an iSCSI Target
Navigate to SAN Manager > iSCSI. Click Create and add following settings

Notes:
Only a name and IQN are required.
The IQN is auto-generated but can be modified for easier recognition
CHAP can be enabled for authentication
Under Network Binding you can specify a specific interface where the iSCSI traffic is permitted on.
Step 2: Create a LUN = Logical Unit Number and bind it to the iSCSI target
Navigate to SAN Manager > iSCSI. Click Create and add following settings:

On the next page you choose the iSCSI target just created:

On the third page you can specify permissions. I choose Allow all:

The last page is just a summay. Click Done and you’re finished with the Synology side.
The Proxmox Side
Prerequisites
Proxmox VE needs to be configured with a network interface, either an Linux VLAN or an OVS IntPort. Check Part 2 to know how I configured it.
Choosing the preferred storage type
After reading proxmox documentation on storage types, I have concluded that these 3 options are the best for me:
Ceph cluster. Unfortunately not possible with my current setup.
ZFS over iSCSI. This supports both shared storage across nodes and snapshots of VM’s. Unfortunately, The iSCSI target has to support ZFS, which Synology doesn’t. TrueNAS does, making me have even more buyers remorse.
Thin LVM over iSCSI. It supports snapshots but can’t be shared across nodes. Since I have only one node anyway, this is good enough.
Creating the iSCSI Initiator in Proxmox
Step 0: Install dependencies
Should be installed already but if not, run this command in CLI:
apt install open-iscsi
Step 1: Create iSCSI Initiator
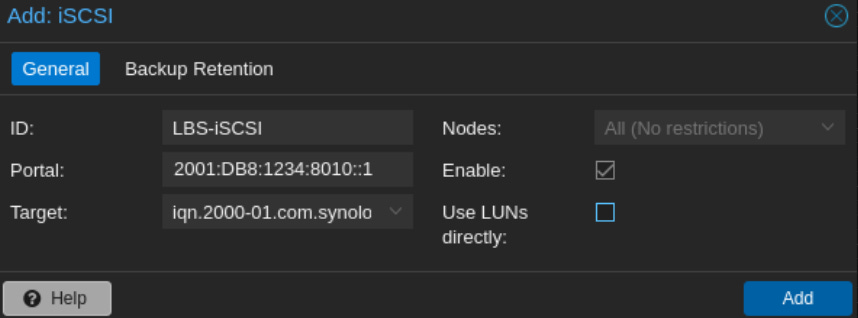
Navigate to Datacenter > Storage > Add > iSCSI.
Settings:
ID: A name for the iSCSI Initiator
Portal: The IP address of the target (In my case, the Synology DSM)
Target: The IQN. Should be automatically populated
Uncheck “Use LUNs directly”

Step 2: Create LVM volume
Now it's time to create an LVM out of the iSCSI drive. This is done through the CLI:
#1: Create a partitioning table on the iSCSI drive and create a physical volume
fdisk /dev/sdd # (the iSCSI drive ID. Check with 'lsblk')
g
n
Enter
Enter
Enter
w

pvcreate /dev/sdd1
#2: create a volume group:
vgcreate VG-iSCSI /dev/sdd1Verify that the Volume Group got created:
root@lbs-pve01:~# vgs
  VG       #PV #LV #SN Attr   VSize  VFree
  VG-HDD     1   1   0 wz--n- <1.82t 19.81g
  VG-iSCSI   1   0   0 wz--n- 32.72t 32.72t
#3: create a logical volume and convert it to thin provision:
lvcreate -l 99%FREE -n LV-iSCSI VG-iSCSI
lvconvert --type thin-pool -c 1024k VG-iSCSI/LV-iSCSI
Explanation:
About LV creation:
-l = how many percentage of the volume you want to use
-L = Manually enter exact size you want to allocate
if you use 100%FREE, the LVM won’t be able to convert into a thin-pool.
About converting to thin-pool:
-c adjusts the chunk size.
The default thick-provisioning does not support snapshots. I found that out the hard way.
Note: If you don’t adjust the chunk size, it will warn about that the thin-pool performance will be degraded:
lvconvert --type thin-pool /dev/LBS-VG-LVM-iSCSI/LBS-LV-LVM-iSCSI
  Thin pool volume with chunk size 32.00 MiB can address at most <7.94 PiB of data.
  WARNING: Pool zeroing and 32.00 MiB large chunk size slows down thin provisioning.
  WARNING: Consider disabling zeroing (-Zn) or using smaller chunk size (<512.00 KiB).
After some browsing, I think it is best to adjust the chunk size, rather than disabling zeroing. 1MiB should be fine, even if it warns about slow performance over 512KiB.
Sources:
Now you can verify with ‘lvs’ or ‘lvdisplay’
root@lbs-pve01:~# lvs
  LV       VG       Attr       LSize  Pool Origin Data%  Meta%  Move Log
  LV-HDD   VG-HDD   -wi-ao----  1.80t
  LV-iSCSI VG-iSCSI twi-a-tz-- 32.39t             0.00   1.17
You can also find the thin-pool under the node > disks > LVM-Thin in the GUI:

Add LVM Thin-Pool to Storage
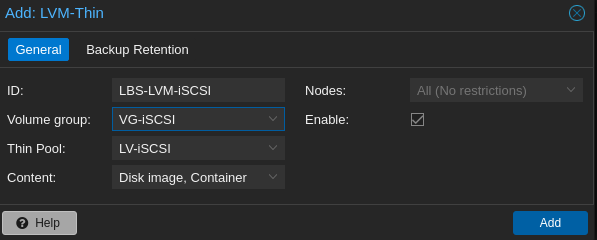
Navigate to Datacenter > Storage. Click Add and select LVM-Thin
ID: Name your Storage type
Volume group: The VG created earlier
Thin Pool: The LV created earlier
Content: Disk images and containers are available for this type of storage.
Verification
As we can see, the LBS-LVM-iSCSI storage is not shared:

I’m going to create a test VM just to see if Snapshots are available:

As we can see, the “Take Snapshot” button is available for this VM:

Special Mentions:
I want to thank Dunuin on the Proxmox forum for sharing his solution on how to create a LVM thin-pool. I had been struggling for hours before i stumbled upon this thread:
https://forum.proxmox.com/threads/adding-a-disk-and-set-it-as-lvm-thin-help-needed-please.111724/
Update: Error messages when running dual-stack
When i ran the command “journalctl -f” the other day I found out that there are many iSCSI related error messages:
Mar 28 16:05:30 lbs-pve01 pvestatd[2353]: command '/usr/bin/iscsiadm --mode node --targetname iqn.2000-01.com.synology:LIBERTASSOLUTIONS.IO.Target-1.415fa909b9c --login' failed: exit code 15
Mar 28 16:05:31 lbs-pve01 iscsid[2538]: Connection-1:0 to [target: iqn.2000-01.com.synology:LIBERTASSOLUTIONS.IO.Target-1.415fa909b9c, portal: fe80::9209:d0ff:fe00:8f4a,3260] through [iface: default] is shutdown.
Mar 28 16:05:31 lbs-pve01 iscsid[2538]: Received invalid login PDU, current stage mismatch, session 1, response 0
Mar 28 16:05:31 lbs-pve01 iscsid[2538]: connection88:0 Login error (Login status 7)
Mar 28 16:05:31 lbs-pve01 iscsid[2538]: Connection88:0 to [target: iqn.2000-01.com.synology:LIBERTASSOLUTIONS.IO.Target-1.415fa909b9c, portal: 2001:db8:1234:8010::1,3260] through [iface: default] is shutdown.
Mar 28 16:05:37 lbs-pve01 kernel: scsi host8: iSCSI Initiator over TCP/IP
Mar 28 16:05:38 lbs-pve01 iscsid[2538]: Could not set session89 priority. READ/WRITE throughout and latency could be affected.
It looks like it tries to start sessions on multiple addresses on the same interface, including IPv4, IPv6 global unicast and IPv6 link-local. There is no problem with the iSCSI connection but it annoys me and fills up the log.
Since the Synology NAS has to be configured with an IPv4 address, the workaround was to disable IPv6 on that specific interface. Now iSCSI only listens to IPv4.
Appendix
Format a large drive with ext4 filesystem
While researching this, I tried different ways of creating a network drive. One of them was to create a file directory on top of the LVM. I abandoned that idea but it felt like a shame to remove this information from the post. So I leave it here in case one day I or someone else needs to create a large ext4 file system.
mkfs.ext4 /dev/VG-iSCSI/LV-iSCSI -O sparse_super,large_file -m 0 -T largefile4Explanation:
-O specifies the features to be enabled for the file system.
sparse_super allows ext4 to store only one real copy of the superblock, which saves disk space and improves the performance of certain operations.
large_file enables support for large files. Read more down below.
-m 0 sets the reserved block percentage to 0, which means that the entire filesystem would be available for regular users, and no blocks would be reserved for privileged processes.
-T largefile4 optimizes the filesystem for large files by using a larger block size.
“The -T largefile flag adjusts the amount of inodes that are allocated at the creation of the file system.”
“Each file requires one inode. If you don't have any inodes left, you cannot create new files. But these statically allocated inodes take space, too. You can expect to save around 1,5 gigabytes for every 100 GB of disk by setting -T largefile, as opposed to the default. -T largefile4 (one inode per 4 MB) does not have such a dramatic effect.”
Sources:
Quick format filesystems in Linux:
https://www.baeldung.com/linux/ext4-file-system-formattingWhat large files means: https://unix.stackexchange.com/questions/43102/largefile-feature-at-creating-file-system