
Network Settings in Linux
Linux Tutorial #3

May 15, 2023
This tutorial will explain how to connect to a network in Ubuntu / Kubuntu.
The Ignorant approach
I have a feeling that there are plenty of computer owners who have no clue how the computers connects to the Internet. They know enough to connect to the wifi, or plug in the cable; and when they see the little network symbol in a connected status, they are good to go. Let’s start with that.

Note: I’m not scolding anyone for not knowing fundamentals about computer networks. There are plenty of things I’m ignorant about myself.
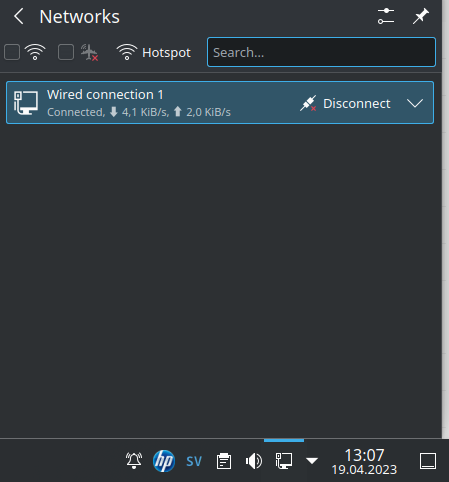
Connecting to a wired network
Maybe not as common nowadays, but there are some security and other technical benefits of using a cabled connection.
When connecting with cable, assuming there is nothing wrong with the network infrastructure, usually it connects automatically. You can see the status by clicking on the network symbol.
Note: On Kubuntu it is by default in the lower right corner, but on Ubuntu it’s in the upper right corner.
If you click on disconnect, the network adapter will be deactivated, and you will no longer be able to use the cabled connection until you turn it on again.

This is handy if you need to restart your network adapter when there are changes on the network. In comparison: on Windows you have to navigate through the control panel settings; on Windows 11 they hid this setting quite well; before you find where you deactivate the network card. Here it is just 2 clicks away.
Connecting to a wireless network
When connecting to a wireless network, click on the same network symbol in the toolbar. Make sure to enable Wi-Fi and then choose the network you want to connect to.

Notice that the symbol in the corner now changed to a Wi-Fi Symbol.

Note: I would always prefer wired connection over wireless connection
That concludes how to connect to a network in Ubuntu / Kubuntu.
Deep Dive
This is the nerdy details about Linux network configuration. If you are new to networking, you might want to read the Network Fundamentals series before you proceed. You have been warned.
Testing DNS
The DNS = Domain Name System is responsible for translating for example “substack.com” into “2606:4700:4400::ac40:9a0b”. In technical terms, it takes the human readable string of a domain and translates it to an address that the computer and other network equipment knows what it is. If DNS is not properly configured, the network might appear not to be in order, but it could be a server issue.
To test name resolution in Linux, open a terminal window and type one of the following commands:
nslookup opensourceisfun.com
dig opensourceisfun.com
host opensourceisfun.com
They all present different outputs. My favorite is nslookup, if you just want to know that name resolution is working
Here are example outputs from all of them:
nslookup
nslookup gives a reply with the server information, and the IP addresses that corresponds with that name. Easy to comprehend:
user@computer:~$ nslookup opensourceisfun.com
Server:         127.0.0.53
Address:        127.0.0.53#53

Non-authoritative answer:
Name:   opensourceisfun.com
Address: 64.68.200.44
Note: 127.0.0.53 is actually not the server used. That is a localhost IP that is being used internally by the system. To show the actual configured DNS servers, use resolvectl status.
user@computer:~$ resolvectl status
Global
       Protocols: -LLMNR -mDNS -DNSOverTLS DNSSEC=no/unsupported
resolv.conf mode: stub

Link 2 (eno1)
    Current Scopes: DNS
         Protocols: +DefaultRoute +LLMNR -mDNS -DNSOverTLS DNSSEC=no/unsupported
Current DNS Server: 2620:119:35::35
       DNS Servers: 2620:119:35::35 2620:119:35::53
dig
dig gives more details than nslookup:
user@computer:~$ dig opensourceisfun.com

; <<>> DiG 9.18.12-0ubuntu0.22.04.1-Ubuntu <<>> opensourceisfun.com
;; global options: +cmd
;; Got answer:
;; ->>HEADER<<- opcode: QUERY, status: NOERROR, id: 27521
;; flags: qr rd ra; QUERY: 1, ANSWER: 1, AUTHORITY: 0, ADDITIONAL: 1

;; OPT PSEUDOSECTION:
; EDNS: version: 0, flags:; udp: 65494
;; QUESTION SECTION:
;opensourceisfun.com.           IN      A

;; ANSWER SECTION:
opensourceisfun.com.    3600    IN      A       64.68.200.44

;; Query time: 255 msec
;; SERVER: 127.0.0.53#53(127.0.0.53) (UDP)
;; WHEN: Mon May 15 16:25:43 CEST 2023
;; MSG SIZE  rcvd: 64
host
host shows addresses and configured mail servers for that domain:
user@computer:~$ host opensourceisfun.com
opensourceisfun.com has address 64.68.200.44
opensourceisfun.com mail is handled by 10 mail.protonmail.ch.
opensourceisfun.com mail is handled by 20 mailsec.protonmail.ch.
Linux Network Files
There are 3 common files on all Linux distributions:
/etc/hosts
/etc/resolve.conf
/etc/nsswitch.conf
Coincidentally, they all have something to do with DNS.
Note: You should never need to edit these files. Most functions are taken over by other applications anyway. Just know that they exist.
/etc/hosts
/etc/hosts is the local name resolution lookup file that has the highest priority when it comes to name-to-IP resolving. Here you can add your own aliases. For example, if you want to go to opensourceisfun.com by just typing “a” in your browser:
user@computer:~$ sudo nano /etc/hosts
127.0.0.1       localhost
127.0.1.1       computer

# Ipv4 opensourceisfun.com
64.68.200.44 a

# The following lines are desirable for IPv6 capable hosts
::1     ip6-localhost ip6-loopback
fe00::0 ip6-localnet
ff00::0 ip6-mcastprefix
ff02::1 ip6-allnodes
ff02::2 ip6-allrouters
If you browse https://a afterwards, this will show up:
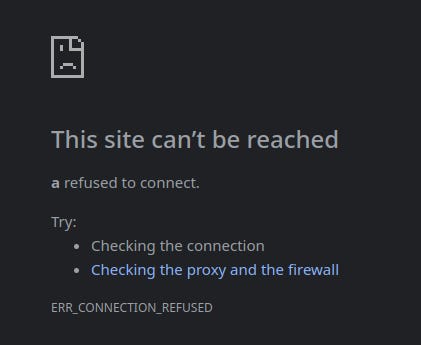
That is because the SSL = Secure Socket Layer is expecting the DNS to be “opensourceisfun.com”. However, look at nslookup:
host@computer:~$ nslookup a
Server:         127.0.0.53
Address:        127.0.0.53#53

Name:   a
Address: 64.68.200.44
/etc/nsswitch.conf
/etc/nsswitch.conf configures in which order DNS lookups should take place. For example, you could modify so that the configured DNS server have higher priority than the etc/hosts file.
user@computer:~$ sudo nano /etc/nsswitch.conf
# /etc/nsswitch.conf
#
# Example configuration of GNU Name Service Switch functionality.
# If you have the `glibc-doc-reference' and `info' packages installed, try:
# `info libc "Name Service Switch"' for information about this file.

passwd:         files systemd
group:          files systemd
shadow:         files
gshadow:        files

hosts:          files mdns4_minimal [NOTFOUND=return] dns
networks:       files

protocols:      db files
services:       db files
ethers:         db files
rpc:            db files

netgroup:       nis
Note: I tried to change the order for testing purposes but it didn't make any difference on Ubuntu 22.04. The Network Manager might be overriding this file, although I haven’t been able to verify it.
/etc/resolv.conf
/etc/resolv.conf shows what DNS servers the host is configured to use. You never edit this file, at least not on Ubuntu. Instead, you use the Network Manager or Netplan to configure nameservers on Ubuntu/Debian.
user@computer:~$ sudo nano /etc/resolv.conf
# This is /run/systemd/resolve/stub-resolv.conf managed by man:systemd-resolved(8).
# Do not edit.
#
# This file might be symlinked as /etc/resolv.conf. If you're looking at
# /etc/resolv.conf and seeing this text, you have followed the symlink.
#
# This is a dynamic resolv.conf file for connecting local clients to the
# internal DNS stub resolver of systemd-resolved. This file lists all
# configured search domains.
#
# Run "resolvectl status" to see details about the uplink DNS servers
# currently in use.
#
# Third party programs should typically not access this file directly, but only
# through the symlink at /etc/resolv.conf. To manage man:resolv.conf(5) in a
# different way, replace this symlink by a static file or a different symlink.
#
# See man:systemd-resolved.service(8) for details about the supported modes of
# operation for /etc/resolv.conf.

nameserver 127.0.0.53
options edns0 trust-ad
search .
Network Settings in Ubuntu/Debian
There are two ways to configure Network settings in Ubuntu:
Network Manager (GUI Based)
Netplan (Command Line)
Configure network settings with Network Manager
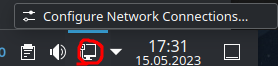
The Network Manager is what you use when right-clicking on the network icon in the corner and choosing Configure Network Connections…
Here is where you can set for example IPv4, IPv6 and DNS addresses manually:
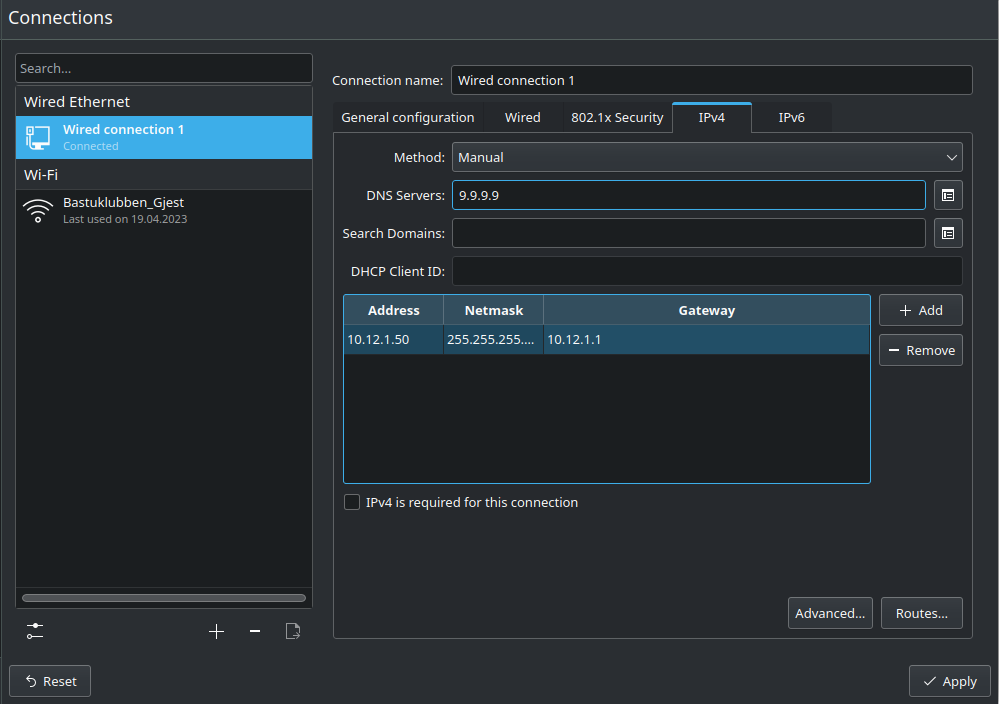
The network manager is good enough for regular clients. However, if you want to do some really advanced stuff, like aggregating 2 network cards into one, or configure multiple routing tables, you need to enable Netplan.
Netplan
Netplan is a YAML-based configuration file that exist on Debian/Ubuntu systems. For server and network admins, it is very easy to configure. Netplan is used by default in Ubuntu servers. It can however be activated on the desktop version to.
To activate netplan, edit the file inside /etc/netplan/. The name of the file can vary depending on the system.
user@computer:~$ sudo nano /etc/netplan/01-network-manager-all.yaml
# Let NetworkManager manage all devices on this system
network:
version: 2
renderer: NetworkManager
For dynamic configuration of IP addresses and DNS, edit this file to look like this:
# Let Netplan manage all devices on this system
network:
version: 2
renderer: networkd # Netplan instead of NetworkManager
ethernets:
   enp3s0: #Check what interfaces are called with "ip add"
     dhcp4: yes
     dhcp6: no
     accept-ra: yes #Enable SLAAC = Stateless Auto Address Configuration
     ipv6-privacy: yes #Enable IPv6 Privacy Extension.
Remember to activate the new configuration:
user@computer:~$ sudo netplan apply
Just as an example what netplan is cabale of, this is how a more advanced setup could look like:
# Let Netplan manage all devices on this system
network:
version: 2
renderer: networkd # Bonding requires networkd
  ethernets: #Check what interfaces are called with "ip add"
   enp3s0:
      dhcp4: no
   enp3s1:
      dhcp4: no

#Below is an example with bonded interfaces

bonds:
   bond0:
     dhcp4: no
     interfaces:
     - enp3s0
     - enp3s1
     parameters:
       mode: 802.3ad #Enables LACP = Link Aggregation Control Protocol
       lacp-rate: fast #Sends LACPDUs every second
       mii-monitor-interval: 100 #Sends keepalives in milliseconds to monitor if a link goes down. 0 means no keepalives.

# Below is regular IP information for the bond interface:

     addresses:
     - 10.10.1.51/24
     - 2001:DB8:0:A010::50/64
     - FE80::10:50/64
     routes:
      - to: 0.0.0.0/0
       via: 10.10.1.1
     - to: ::/0
       via: FE80::10:1
     nameservers:
        addresses:
        - 2620:119:35::35
        - 2620:119:35::53
        search:
        - bastuklubben.online
There was a great link for more netplan references. Unfortunately, the links seems to be broken at the moment:
Appendix
Important Privacy Concerns regarding IPv6 addresses
This covered in detail here:
https://opensourceisfun.substack.com/i/124754146/privacy-concerns-regarding-ipv-addresses