
Linux Networking: Turning your Debian server into a router with VRF support
How-To: Linux Networking and Debian

Monday 23rd March 2026
I have in the past written about how to setup an OOBM network interface on Debian and Ubuntu, using VRF configuration. It turns out that if you want to use your Linux machine as a router, there are more things to consider than just creating a VRF and assign interfaces to it. This article will go more in depth on how to properly configure your Debian server to become an advanced Linux router.
I recommend Debian because it comes installed with ifupdown, which is very versatile when it comes to advanced routing. If you have installed Debian 13 with GUI however, then Network Manager is used by default. You can however easily switch to use ifupdown.
This article also serves as a buildup for my upcoming article on improving my wireguard setup.
Design
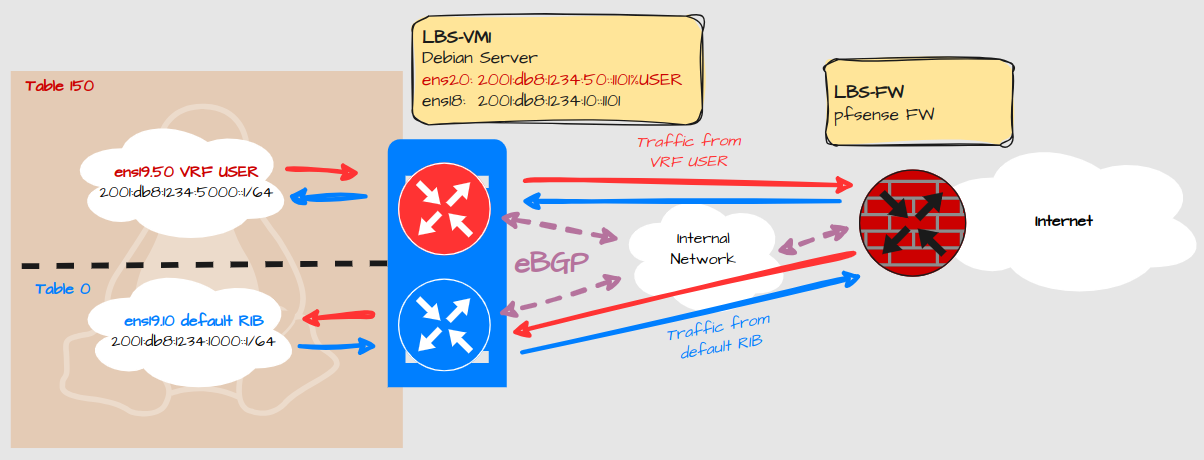
Explanation:
This Linux machine has two routing tables defined:
The default routing table and;
VRF USER
No traffic should be leaked between interfaces on the same server
Services should be able to expose ports on all VRF’s
Only IPv6 will be covered as there is little to no difference with IPv4.
Configuration
Basic VRF Configuration
Let’s start with the basic VRF creation and how to assign an interface.
Virtual Machine Ethernet Adapters
These network adapters are assigned to the Linux server:

Net0 = ens18. Linknet Default table
Net1 = ens19. LAN default table and VRF USER
Net2 = ens20. Linknet VRF USER
ifupdown configuration
sudo nano /etc/network/interface
# VRF USER
auto USER
iface USER inet manual
  pre-up ip link add $IFACE type vrf table 150
  up ip link set dev $IFACE up
  down ip link set dev $IFACE down
  post-down ip link del $IFACE

# The primary network interface
iface ens18 inet6 static
  address 2001:db8:1234:10::1101/64
  gateway fe80::1:1

iface ens19 inet manual
  bridge-ports none
  bridge-stp off
  bridge-fd 0
  bridge-vlan-aware yes
  bridge-vids 2-64
  up ip link set dev $IFACE up
  down ip link set dev $IFACE down

#Default table LAN
auto ens19.10
iface ens19.10 inet6 static
  address 2001:db8:1234:1000::1/64

iface ens19.10 inet6 static
  address FE80::1/64

# LBS USER VLAN
auto ens19.50
iface ens19.50 inet6 static
  pre-up ip link set dev $IFACE master USER
  address 2001:db8:1234:5000::1/64

iface ens19.50 inet6 static
  pre-up ip link set dev $IFACE master USER
  address FE80::1/64

# The User Linknet
iface ens20 inet6 static
  pre-up ip link set dev $IFACE master USER
  address 2001:db8:1234:50::1101/64
  pre-down ip link set dev $IFACE nomaster
Explanation:
First we define the VRF with a name and a table ID.
Secondly we assign the VRF to the relevant interfaces.
There is no Proxmox guest firewall enabled for ens19. Therefore it is configured as a bridge so we can configure VLAN interfaces for LAN.
ens18 and 20 shares the same underlying bridge (vmbr2) so they could also be combined and configured as VLANs. However, these are linknets must be separate adapters for the Proxmox Guest Firewall to work.
FRR Configuration
FRR (Free-Range Routing) is used to configure routing protocols like BGP. It’s strictly not necessary for testing VRF configuration, you could use static routes instead, but it is used in my environment.
To install FRR with the latest version, follow the instructions here.
Configure BGP neighbors
Note: If you are new to the concept of BGP or dynamic routing protocols in general, this might go over your head. I can’t explain every detail.
Debian Server
route-map RM_SET_COMMUNITIES permit 10
 set community 65001:1 no-export
!
route-map RM_LBS-RO1_OUT permit 10
 match community CL_LBS_DC1
 set community 65001:3 no-export
!
bgp community-list standard CL_LBS_DC1 seq 5 permit 65001:1
bgp community-list standard CL_LBS_DC2 seq 5 permit 65001:2
bgp community-list standard CL_LBS_FW1 seq 5 permit 65000:1
!
ipv6 route 2001:db8:1234:1000::/60 blackhole tag 4 254
!
vrf USER
 ipv6 route 2001:db8:1234:5000::/60 blackhole tag 4 254
!
router bgp 65001
 bgp router-id 192.168.0.1
 no bgp ebgp-requires-policy
 no bgp default ipv4-unicast
 no bgp network import-check
 neighbor 2001:db8:1234:10::1 remote-as 65001
 neighbor 2001:db8:1234:10::1 password XXXXXXXX
 neighbor 2001:db8:1234:10::1 update-source ens18
 !
 address-family ipv6 unicast
  network 2001:db8:1234:1000::1/128 route-map RM_SET_COMMUNITIES
  redistribute static route-map RM_SET_COMMUNITIES
  neighbor 2001:db8:1234:10::1 activate
  neighbor 2001:db8:1234:10::1 route-reflector-client
  neighbor 2001:db8:1234:10::1 next-hop-self force
  neighbor 2001:db8:1234:10::1 next-hop-self
  neighbor 2001:db8:1234:10::1 soft-reconfiguration inbound
  neighbor 2001:db8:1234:10::1 route-map RM_LBS-RO1_OUT out
 exit-address-family
exit
!
router bgp 65001 vrf USER
 bgp router-id 192.168.0.1
 no bgp ebgp-requires-policy
 no bgp default ipv4-unicast
 no bgp network import-check
 neighbor 2001:db8:1234:50::1 remote-as 65001
 neighbor 2001:db8:1234:50::1 password XXXXXXXX
 neighbor 2001:db8:1234:50::1 update-source ens20
 !
 address-family ipv6 unicast
  network 2001:db8:1234:5000::1/128 route-map RM_SET_COMMUNITIES
  redistribute static route-map RM_SET_COMMUNITIES
  neighbor 2001:db8:1234:50::1 activate
  neighbor 2001:db8:1234:50::1 route-reflector-client
  neighbor 2001:db8:1234:50::1 next-hop-self force
  neighbor 2001:db8:1234:50::1 next-hop-self
  neighbor 2001:db8:1234:50::1 soft-reconfiguration inbound
  neighbor 2001:db8:1234:50::1 route-map RM_LBS-RO1_OUT out
 exit-address-family
exit
Explanation:
There is some advanced configuration included like route-maps and well-known communities. Those are specific for my setup and are explained in this article.
Remote router
I’m peering with a Vyos router upstream, which is using FRR in the backend. This is how the configuration looks over there:
route-map RM_TENANTS_OUT permit 10
 match community CL-LBS-FW
 set community no-advertise
!
bgp community-list expanded CL-LBS-FW seq 10 permit 65000:1
!
!
router bgp 65001 vrf DC
 bgp router-id 10.0.1.3
 no bgp ebgp-requires-policy
 no bgp default ipv4-unicast
 no bgp network import-check
 neighbor PG-DC peer-group
 neighbor PG-DC remote-as 65001
 neighbor PG-DC password XXXXXXXX
 neighbor PG-DC passive
 no neighbor PG-DC enforce-first-as
 neighbor PG-DC update-source br0.4001
 bgp listen range 2001:db8:1234:10::/108 peer-group PG-DC
 !
 address-family ipv6 unicast
  network 2001:db8:1234:10::/64
  aggregate-address 2001:db8:1234::/50 summary-only
  neighbor PG-DC activate
  neighbor PG-DC next-hop-self
  neighbor PG-DC route-map RM_TENANTS_OUT out
 exit-address-family
exit
!
router bgp 65001 vrf USER
 bgp router-id 10.0.5.3
 no bgp ebgp-requires-policy
 no bgp default ipv4-unicast
 no bgp network import-check
 neighbor PG-USER peer-group
 neighbor PG-USER remote-as 65001
 neighbor PG-USER password XXXXXXXX
 neighbor PG-USER passive
 no neighbor PG-USER enforce-first-as
 neighbor PG-USER update-source br0.4005
 bgp listen range 2001:db8:1234:50::/108 peer-group PG-USER
 !
 address-family ipv6 unicast
  network 2001:db8:1234:50::/64
  aggregate-address 2001:db8:1234:5000::/52 summary-only
  neighbor PG-USER activate
  neighbor PG-USER next-hop-self
  neighbor PG-USER route-map RM_TENANTS_OUT out
 exit-address-family
exit
Explanation:
Neighbors can form dynamically within the configured listen-range. This way I don’t have to add statically configured neighbors every time a new Linux server needs to peer.
You don’t configure FRR directly in Vyos. The actual configuration commands used on Vyos are out of scope for this article but I have written about BGP configuration on Vyos in the past.
Firewall Configuration
The firewall acts as a gateway between VRFs. It controls what traffic is allowed to pass from one VRF to another. The configuration of the pfsense firewall is out-of-scope for this article but I have written about BGP peering on pfsense in the past.
Sysctl Configuration
Allow services to bind to all VRFs
By default TCP and UDP services will only be exposed to the default routing table. Some services can be configured to expose their port to a specific VRF, but that is complicated and usually unstable. It’s therefore much easier to expose services to all VRFs. Services can then be configured to use a specific IP.
Create a file called /etc/sysctl.d/VRFBindAll.conf:
net.ipv4.tcp_l3mdev_accept=1
net.ipv4.udp_l3mdev_accept=1
Explanation:
This allows services to expose TCP and UDP ports to all VRFs.
This configuration works for IPv6 as well, even if it says “ipv4”. This can be verified by SSH later on.
Enable forwarding of IPv6 and IPv4 traffic
Create a file called /etc/sysctl.d/forwarding:
net.ipv4.ip_forward=1
net.ipv4.conf.all.src_valid_mark=1
net.ipv6.conf.all.disable_ipv6=0
net.ipv6.conf.all.forwarding=1
net.ipv6.conf.default.forwarding=1
This allows IPv4 and IPv6 forwarding, which is essential to allow for traffic that is passing through the server.
net.ipv4.conf.all.src_valid_mark=1 enables policy-based routing which may be useful when configuring Wireguard VPN.
Then reboot or run:
sudo sysctl -p /etc/sysctl.d/VRFBindAll.conf
sudo sysctl -p /etc/sysctl.d/forwarding
IP Rule Configuration
By default, a Linux Server will lookup all local interfaces for a match in the routing destination, regardless of which routing table it belongs to.
$ ip -6 rule show
0:      from all lookup local
1000:   from all lookup [l3mdev-table]
32766:  from all lookup main

$ ip rule show
0:      from all lookup local
1000:   from all lookup [l3mdev-table]
32766:  from all lookup main
32767:  from all lookup default
That is not optimal behavior of a router. To prevent route leaking between VRFs, we need to modify this behavior:
ip -6 rule add pref 2000 l3mdev unreachable
ip -6 rule add pref 32765 table local
ip -6 rule del pref 0

ip rule add pref 2000 l3mdev unreachable
ip rule add pref 32765 table local
ip rule del pref 0
This should be the result:
~$ ip -6 rule show
1000: from all lookup [l3mdev-table]
2000: from all lookup [l3mdev-table] unreachable
32765: from all lookup local
32766: from all lookup main

~$ ip rule show
1000: from all lookup [l3mdev-table]
2000: from all lookup [l3mdev-table] unreachable
32765: from all lookup local
32766: from all lookup main
32767: from all lookup default
However, as all settings written in a Linux terminal are lost after a reboot, these are no exception. Usually there is a related configuration file under /etc, but I haven’t found one for these specific commands.
Therefore there are multiple ways to make this permanent and as far as I know there is no “right” or “wrong” way to do it. My solution was to set these ip rules under the loopback interface, since that interface should always be up.
nano /etc/network/interfaces:
# The loopback network interface
auto lo
iface lo inet loopback
  post-up ip -6 rule add pref 1000 l3mdev
  post-up ip -6 rule add pref 2000 l3mdev unreachable
  post-up ip -6 rule add pref 32765 table local
  post-up ip -6 rule del pref 0
  post-up ip rule add pref 1000 l3mdev
  post-up ip rule add pref 2000 l3mdev unreachable
  post-up ip rule add pref 32765 table local
  post-up ip rule del pref 0
Note: you can apparently add all kinds of parameters under the interface configuration. For example you can add sysctl configuration that is specific for an interface. This is useful if it’s a virtual interface that is not created at system boot.
Verification
If I now perform a ping, we can see that the TTL is lower than 64, indicating that the traffic has left the local machine and come back through the other interface, as a router is expected to work:
$ sudo ip vrf exec USER ping 2001:db8:1234:1000::1 -I 2001:db8:1234:5000::1
PING 2001:db8:1234:1000::1 (2001:db8:1234:1000::1) from 2001:db8:1234:5000::1 : 56 data bytes
64 bytes from 2001:db8:1234:1000::1: icmp_seq=1 ttl=61 time=1.83 ms
64 bytes from 2001:db8:1234:1000::1: icmp_seq=2 ttl=61 time=1.80 ms
64 bytes from 2001:db8:1234:1000::1: icmp_seq=3 ttl=61 time=1.70 ms
That means I don’t have to prove to you that it traversed to upstream firewall and then down again, but for you skeptics I include a packet capture from my pfsense anyway:
17:28:22.554764 IP6 2001:db8:1234:5000::1 > 2001:db8:1234:1000::1: ICMP6, echo request, id 14, seq 1, length 64
17:28:22.555683 IP6 2001:db8:1234:1000::1 > 2001:db8:1234:5000::1: ICMP6, echo reply, id 14, seq 1, length 64
17:28:23.556477 IP6 2001:db8:1234:5000::1 > 2001:db8:1234:1000::1: ICMP6, echo request, id 14, seq 2, length 64
17:28:23.557437 IP6 2001:db8:1234:1000::1 > 2001:db8:1234:5000::1: ICMP6, echo reply, id 14, seq 2, length 64
17:28:24.557938 IP6 2001:db8:1234:5000::1 > 2001:db8:1234:1000::1: ICMP6, echo request, id 14, seq 3, length 64
17:28:24.558940 IP6 2001:db8:1234:1000::1 > 2001:db8:1234:5000::1: ICMP6, echo reply, id 14, seq 3, length 64
17:28:25.559380 IP6 2001:db8:1234:5000::1 > 2001:db8:1234:1000::1: ICMP6, echo request, id 14, seq 4, length 64
17:28:25.560317 IP6 2001:db8:1234:1000::1 > 2001:db8:1234:5000::1: ICMP6, echo reply, id 14, seq 4, length 64
17:28:26.560862 IP6 2001:db8:1234:5000::1 > 2001:db8:1234:1000::1: ICMP6, echo request, id 14, seq 5, length 64
17:28:26.561703 IP6 2001:db8:1234:1000::1 > 2001:db8:1234:5000::1: ICMP6, echo reply, id 14, seq 5, length 64
To verify that services are exposing their ports to both VRFs I have temporarily allowed incoming SSH on both VRFs:
$ ssh 2001:db8:1234:5000::1
(wl@2001:db8:1234:5000::1) Password:
Linux lbs-vm1.int.libertassolutions.io 6.12.69+deb13-amd64 #1 SMP PREEMPT_DYNAMIC Debian 6.12.69-1 (2026-02-08) x86_64
...
$ ssh 2001:db8:1234:1000::1
(wl@2001:db8:1234:1000::1) Password:
Linux lbs-vm1.int.libertassolutions.io 6.12.69+deb13-amd64 #1 SMP PREEMPT_DYNAMIC Debian 6.12.69-1 (2026-02-08) x86_64