
Installing Linux on an M.2 SSD drive
Linux Tutorial #1: Advanced Task 1

If your computer have one of those new M.2 SSD’s, they might not show up under Disk Setup. The reason for this is because M.2 are using a PCIe slot on the motherboard, while regular SSD’s or HDD’s are using SATA connections.

To make the computer load the M.2 drive, you need to do some additional edits inside UEFI BIOS, and also add a bootloader variable before starting the installation guide.
Changing SATA settings in UEFI BIOS
Step 1: Enter UEFI BIOS. Look for settings related to SATA. Most likely under the Advanced section.
Step 2: Switch SATA mode from RAID to AHCI
Step 3: Save and Exit (F10)
Note: Changing SATA mode might make the Windows system become unavailable. That is why dual boot can become complicated.
You can test if the disk is visible in the installation now. If still not visible, go ahead with the next task.
Make an edit to the bootloader
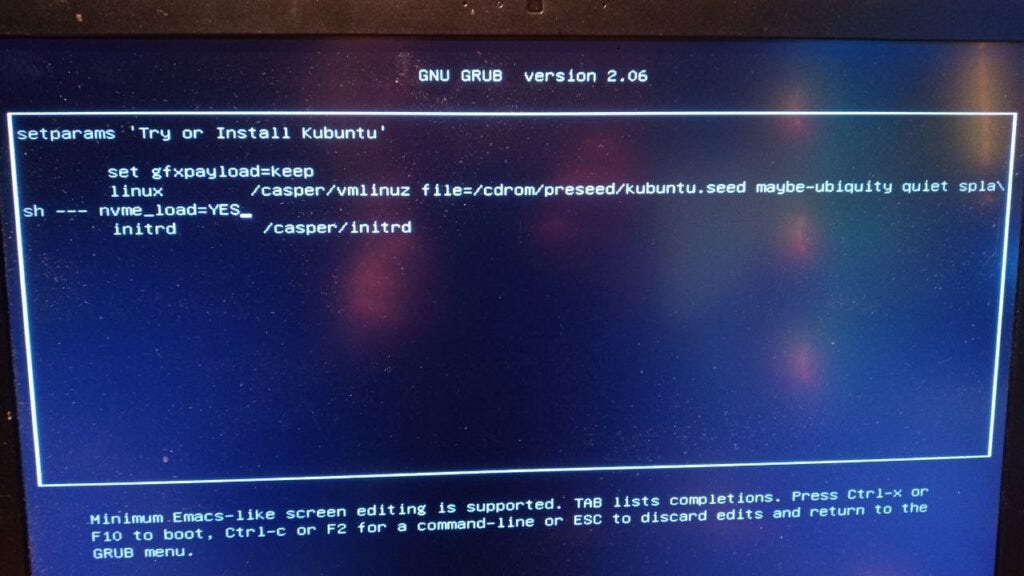
Step 1: While on the screen with the menu for startup alternatives; Instead of pressing ENTER on Try or Install Kubuntu, press E instead.
Step 2: A screen with the GRUB bootloader configuration will show up. Edit the row that begins with linux. At the end, write nvme_load=YES. See picture below.
Step 3: Press F10 to boot the installation media
Note: The keyboard is set to US layout
The disk should now be visible under Disk Setup and be listed as /dev/nvme0
Related Topics
Linux Tutorial #1: Installing Linux
Installing Linux on 2 drives