
Docker Networks Part 1: Networks, Address planning and changing the defaults
Network Design

24th June 2024
Updated on 7th July 2024 - Edited the part about the MACVLAN driver.
Updated on 14th May 2025 - Added an update on the IPv6 DNS caveat
Updated on 26th May 2025 - Updated that IPv4 can be turned off on individual networks now

I have been studying docker for a couple of months now. Most learning material glance over the network details. It’s very quick and easy to setup docker containers if you don’t care about networks. I however prefer if all my network components are predictable.
Therefore I decided to make a post about docker networking. This post turned out to be big enough for at least 3 posts. So this is the first part of Docker and Networks.
Docker networks
There are many kinds of docker networks. The type of network depends on what driver setting you are using and how you are creating the container.
Docker Network Drivers
Source: https://docs.docker.com/network/drivers/
Bridge
Source: https://docs.docker.com/network/drivers/bridge/
Bridge is the default setting. A bridge is the same thing as a switch. It creates it's own virtual network card with it's own subnet settings
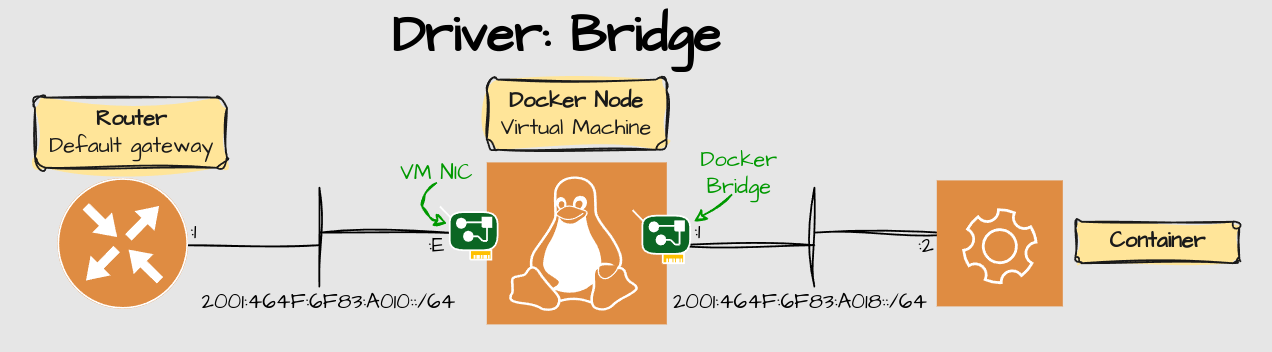
These container subnets are routable, but if no routing protocol is running between the router and the docker node, the router will not know where to forward traffic for the docker bridge network.
The Default Bridge
Unless the --network is specified, The default bridge is the network standalone containers and docker services will use.
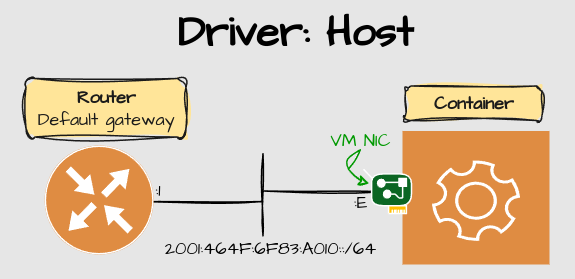
Host
Source: https://docs.docker.com/network/drivers/host/
Host network driver makes the containers use the same IP settings as the host node does.
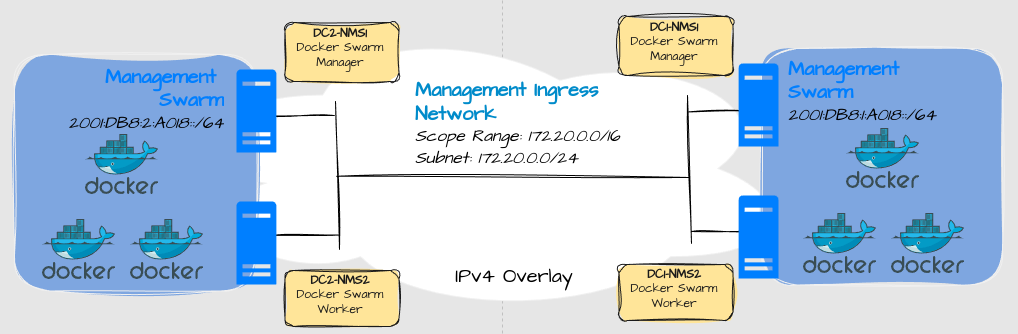
Overlay
Overlay networks are used by nodes to communicate directly with each other across L3 networks. This kind of network is only reachable by the member nodes. One example of an overlay is when you use Docker swarms. More on that in a later post.
None
Source: https://docs.docker.com/network/drivers/none/
The driver “none” will completely isolate the container from external networks and other containers.
MACVLAN
Source: https://docs.docker.com/network/drivers/macvlan/
UPDATE: MACVLAN at a glance looks very similar to IPVLAN L2 mode, but has one significant difference: The containers get unique MAC addresses. With IPVLAN layer 2 mode, the container gets the same MAC as the host node.
IPVLAN
Source: https://docs.docker.com/network/drivers/ipvlan/
IPVLAN has two modes:
L2 (Layer 2) IPVLAN
L2 IPVLAN makes the containers look like they are connected directly on the same subnet as the docker node. It does that by bridging the VM NIC, instead of creating an entire new virtual NIC:
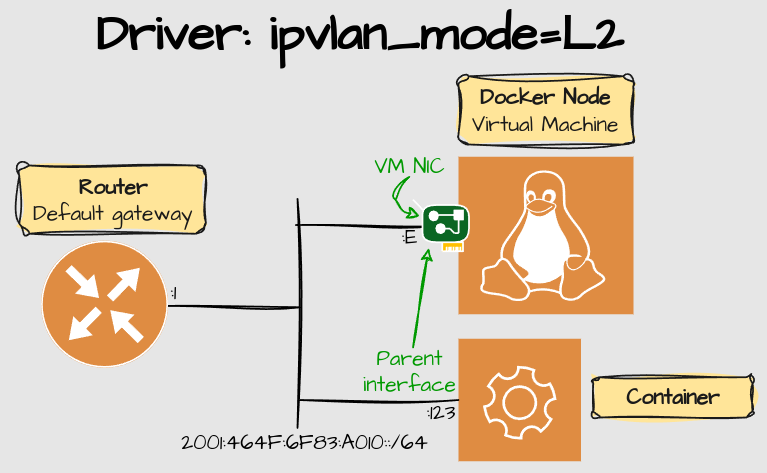
L2 IPVLAN can also be configured with different VLANs if the docker nodes supports subinterfaces. You can read the details in dockers documentation.
L3 (Layer 3) IPVLAN
L3 IPVLAN is at first glance very similar to bridge mode, but with a few suddle differences that makes it more scalable.
L3 IPVLAN doesn't use a gateway. Instead, the containers routes the traffic to the parent interface. Note that the parent interface is not on the same network as the containers:
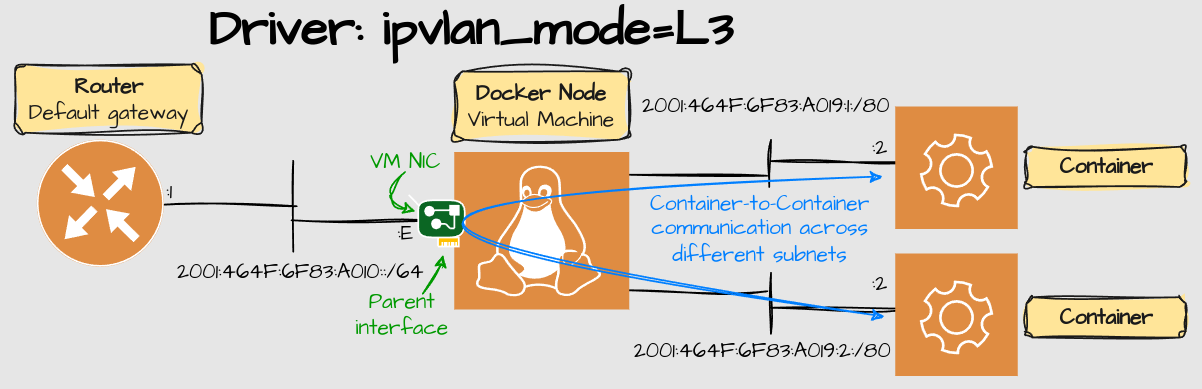
IPVLAN L3 networks can also be routed to external networks as long as a routing protocol is setup between the router and the docker node.
Note: IPvlan L3 mode drops all broadcast and multicast traffic. That gives scalability to IPv4 networks, although I'm not so sure it gives any benefit to IPv6, as it has no concept of a broadcast to begin with.
Docker network creation
You can create docker networks in different ways:
Custom Networks - You can create your own networks with the
docker network createcommand.Docker Compose - When creating an application with docker compose, by default it creates an application-specific network. You can edit this network to your liking, or use the default bridge instead. More on Docker Compose in a later post.
Docker Swarm - When you create a docker swarm, a special kind of overlay network is created that supports high availability and load balancing. More on that in a later post.
Depending on how structured you are; you may leave all these for the defaults, or edit all the defaults to something more predictable. A benefit when of editing the defaults is that it is mitigating the risk for overlap with other networks. For IPv6 connectivity, you have to modify the default settings.
Docker IP address planning
IPv4 Address planning
Making a structured IPv4 address planning with docker feels somewhat limited. But you have to do it because there is no way of turning IPv4 off, unless you completely turn off IPv4 on the host system. That could be an option as long as you are not planning to use docker swarms.
Update: You can actually turn off IPv4 on specific networks now by including this flag in the docker run command:
-o com.docker.network.enable_ipv4=falseThe main problem with IPv4 addressing is that you only have 24 bits to work with. For example:
IPv4 address planning examples
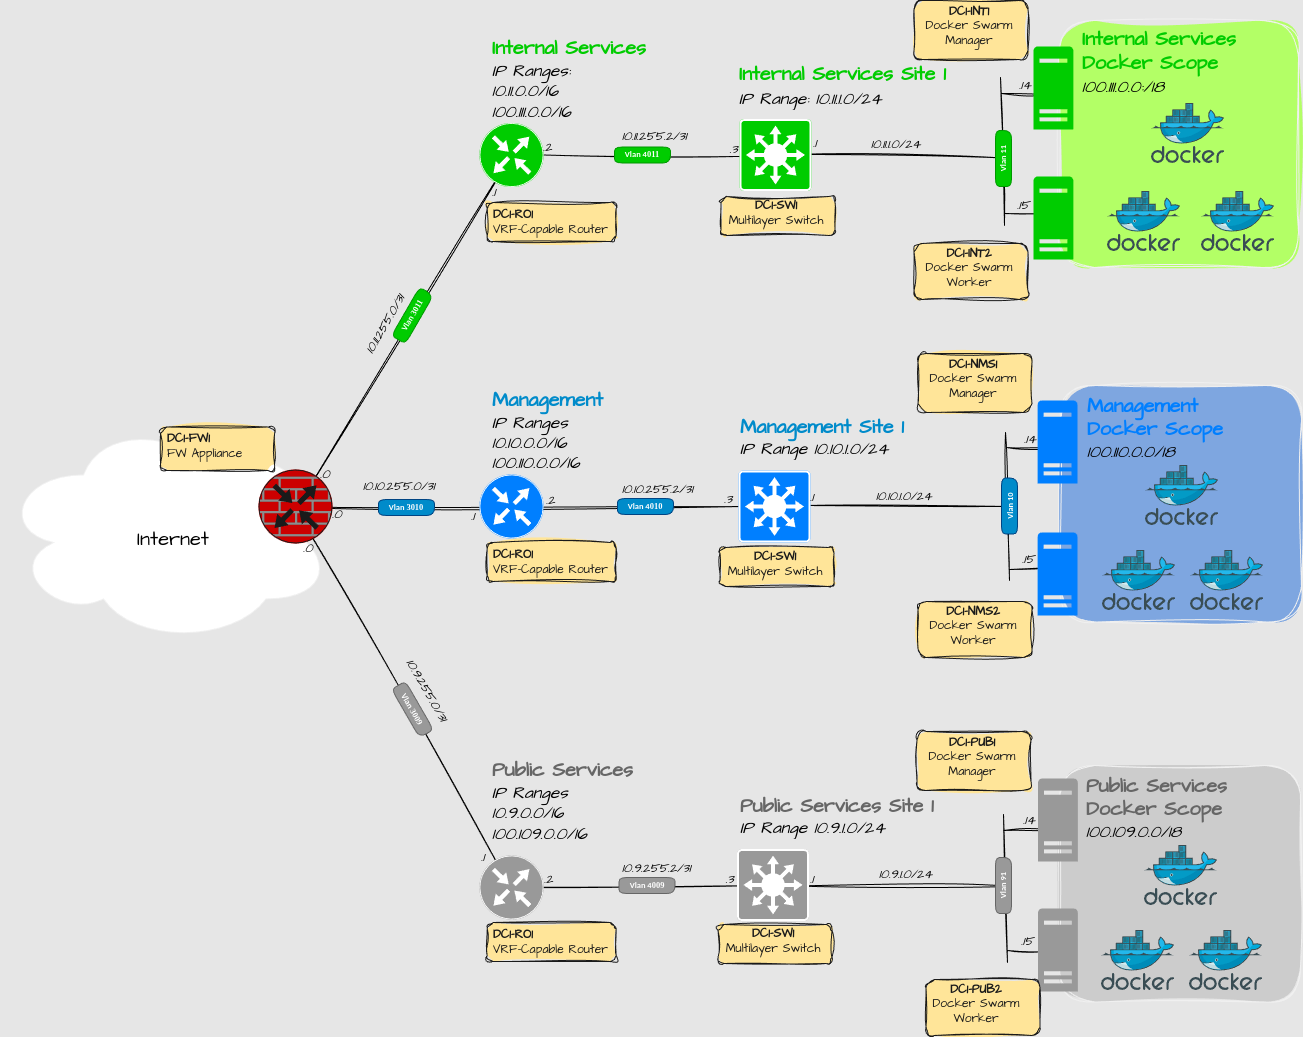
Let’s say you want to assign an IPv4 network scope to the management network on site 1, subnet 1. Then you can use for example:
Example IP: 100.110.1.1/24:
100.= If you don’t use it for anything else, the private scope of 100.96.0.0/10 can be used to identify docker networks. It is one of the most flexible private IP ranges.
100.110. = second octet identifies this as MGMT
10.110.1. = third octet identifies the site ID. Last octet is used for the host part.
That will give you 64 available network types, 256 available sites and 1 subnet with 254 available IPv4 addresses.
That’s all fine but what if you need a second subnet? darn… Now you have to compromise by reducing either the number of sites or the number of containers per subnet.
You could eliminate the site ID entirely and just reuse the same network at multiple sites. As long as you are not routing those internal networks to external networks, it should be fine. If you remove the site ID from the equation, with the same scope you get:
Example IP: 100.110.0.1/24:
100. = “This is docker”
10.110. = second octet identifies this as MGMT
10.110.0. = third octet is the subnet. last octet is used for the host part.
Then you can have one site with 256 subnets with 254 available IP addresses in each subnet. I wouldn’t expose this network outside of the docker daemon as it could start overlapping with other sites.
Of course you could probably think of more examples on how to allocate subnets. The point I’m trying to make here is that it’s not so flexible when using IPv4. I wonder how Amazon or Google does it.
You could argue that I’m overthinking this. Container networks are mostly isolated anyway. Maybe I’m just used to think that every logical identifier has to have a meaning behind it. However, I think it really helps when you can look at an IP address, you know exactly where it belongs.
My IPv4 docker address plan
Personally i went for this:
Example IP: 100.110.0.1/24
100. = “This is docker”
100.110. = Management Network
100.110.0-63. = Subnet range Site 1
100.110.64-127. = Subnet range Site 2
It’s unlikely that i will need more than 2 sites but I still have 128 subnets unallocated for future use. With this address plan I can use for example:
100.110.0.0/24 = Default bridge network
100.110.63.0/24 = docker_gwbridge network (used to bridge overlay networks)
100.110.62.0/24 = Overlay Network
100.110.1-61/24 = custom networks and compose networks.
IPv6 Address planning
IPv6 address planning on the other hand, is much more flexible. It helps having 64 bits available rather than 24. Why not more I will explain next.
Docker IPv6 Limitations
There are some limitations to IPv6 in docker:
Minimum prefix length for a scope is 64 bits. If you configure a default scope, your subnets has to be /65 or longer (meaning more specific) The reason for that is that there is a related integer setting in docker that has a 64 bit length. Therefore, scopes less specific than /64 will not work.
Too big difference between the default IPv6 scope and the IPv6 subnets will consume an excessive amount of RAM. Docker recommends the difference not be more than 24 bits.
IPv6 Address planning examples
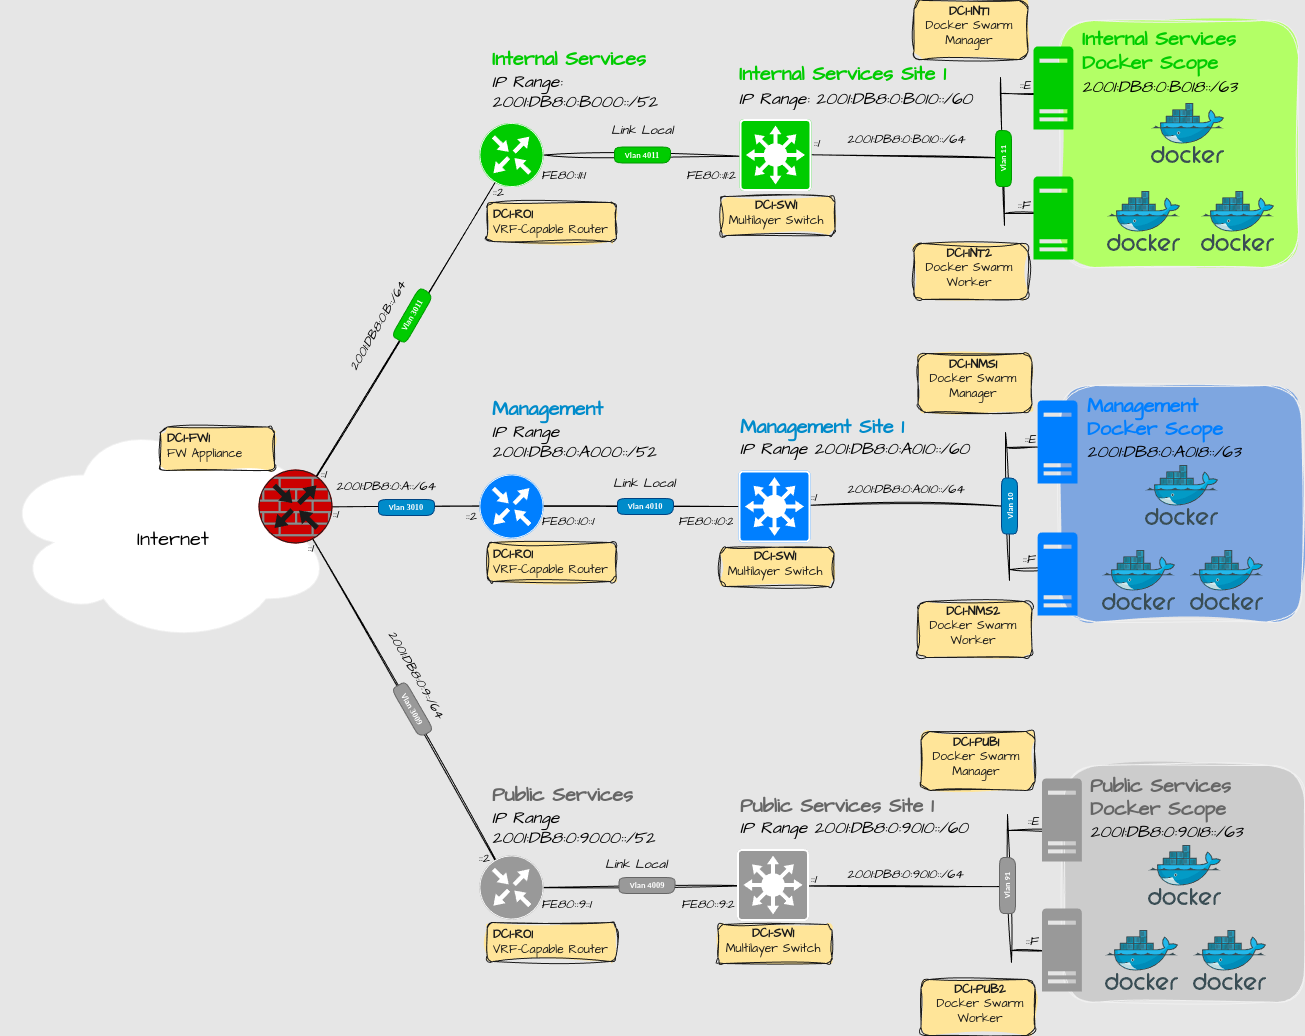
Depending on your organization you may have anything between /29 and /48 prefix length assigned. Let’s assume you have a modest PI = Provider Independent scope of /40:
IPv6 address example: 2001:0DB8:0000:000A:0180:0000:0000:0001/64:
2001:0DB8:00: = fixed 40 bits that identifies your AS.
2001:0DB8:000A: = next 8 bits identifies the network type. You can either have 256 different network domains, or 16 different network domains in 16 different autonomous systems.
2001:0DB8:000A:01 = next 8 bits (first two nibbles in the fifth quartet) identifies the site ID. This gives 256 available sites.
2001:0DB8:000A:0180 = next 10 bits (third and fourth nibble in the fourth quartet) identifies if this is a regular subnet (00-7F), or a container subnet (80-FF). This gives 128 available regular subnets for servers, VM’s and appliances. And (at least) 128 subnets for docker.
Docker IPv6 scopes
Normally you should always give IPv6 subnets a prefix length of /64, regardless of size on the network. There are 2 exceptions:
Link-nets are recommended to have a /127 or /64.
Docker container networks
Because of the integer issue, minimum IPv6 scope length is /64. That means that your subnets that docker assigns from the scope has to be more specific than that. I personally use /64 for the scope and /80 for the subnets. That gives me 65536 possible IPv6 subnets that are big enough to fit a MAC address in each address.
My IPv6 docker address plan
I “only” have a /48 PA = Provider Assigned address scope at home. That is quite big for a residential usage, but I’m a bit of a special customer so I have managed to utilize these bits to the fullest.
With a /48 I have managed to do following scheme:
2001:0DB8:0000:A018::/63:
2001:0DB8:0000: = Fixed 48 bits (example scope).
2001:DB8:0:A = This is management network
2001:DB8:0:A01 = This is site one
2001:DB8:0:A018: = 0-7 is normal subnets. 8-F is docker subnets.
That makes route summarization very efficient compared to IPv4, where I have to add an additional entry for the 100 ranges. With this address plan I can use for example:
2001:DB8:0:A018::/64 = Default bridge network
2001:DB8:0:A01F::/64 = docker_gwbridge network
FC01:A::/29 = Overlay Networks (ULA because these networks are not routable anyway)
2001:DB8:0:A019:0000-FFFF::/80 = custom networks and compose networks.
With this scheme I can get 65 536 custom subnets per site, every host address is big enough to fit a MAC address and ranges through :A01A-E::/64 are still unused.
Changing the defaults
To change the default address scopes for both IPv4 and IPv6, edit the docker daemon:
sudo nano /etc/docker/daemon.json
{
  "ipv6": true,
  "fixed-cidr-v6": "2001:DB8:0:A018::/64",
  "experimental": true,
  "ip6tables": true,
  "dns": ["2620:FE::FE"],
  "bip": "100.110.0.1/24",
  "default-address-pools": [
    { "base": "100.110.0.0/18", "size": 24 },
    { "base": "2001:DB8:0:A019::/64", "size": 80 }
  ]
}
sudo systemctl restart docker
Explanation:
“Ipv6: true”,“experimental: true”and“ip6tables: true”are required for enabling IPv6.“fixed-cidr-v6”specifies the IPv6 subnet for the default bridge“bip”specifies the IPv4 subnet for the default bridge"default-address-pools"enable you to specify your own default address pools for custom networks.“dns” has to be an IPv4 address. It’s been an open issue since 2017:moby#32675
UPDATE: Specifying only a IPv6 DNS server actually works now! I have tested on a container with the default bridge and with a compose-created network, Docker version 28.1.1
Verification
Check the configured network on the interface called docker0:
$ ifconfig docker0
docker0: flags=4099<UP,BROADCAST,MULTICAST>  mtu 1500
        inet 100.110.0.1  netmask 255.255.255.0  broadcast 100.110.0.255
        inet6 fe80::1  prefixlen 64  scopeid 0x20<link>
        inet6 2001:DB8:0:a018::1  prefixlen 64  scopeid 0x0<global>
        ether 02:42:62:45:b6:6d  txqueuelen 0  (Ethernet)
        RX packets 0  bytes 0 (0.0 B)
        RX errors 0  dropped 0  overruns 0  frame 0
        TX packets 0  bytes 0 (0.0 B)
        TX errors 0  dropped 0 overruns 0  carrier 0  collisions 0
Inspect a container created with docker compose to see what subnets got assigned:
$ docker container inspect sauna-caddy-1 | grep IP
...
                    "IPAMConfig": null,
                    "IPAddress": "100.110.1.4",
                    "IPPrefixLen": 24,
                    "IPv6Gateway": "2001:DB8:0:a019::1",
                    "GlobalIPv6Address": "2001:DB8:0:a019::4",
                    "GlobalIPv6PrefixLen": 80,