
Container Management using Portainer and Homarr
Container Management Strategy

Monday 5th January 2026
Background
I recently migrated my services from my DIY server do an actual server, a Dell Poweredge R730 if you want to know. When you move from one platform to another, you don’t want to transfer all the mistakes you did as well, so I started to plan a what I wanted to do differently this time.
I really wanted to go for TrueNAS as the hypervisor because of the easy management of storage and caching features. However, TrueNAS lacks the necessary firewall capabilities to isolate virtual machines from communicating to each other. Therefore, Proxmox was chosen once again.
TrueNAS will eventually make an introduction in my infrastructure. I could use it as an iSCSI target and perform ZFS over iSCSI to a PVE cluster. Now on to the main topic of this post: Container management.
Problems with my old setup
The problem with my old setup was that I managed all my containers through CLI. It was manageable when it was only 5 compose projects, but the number of applications are growing.
Reaching the services webGUI interfaces was not that easy either, even with DNS, you still had to know the portnumber.
Migration was also a pain because how the volumes was setup. Some uses relative paths while other uses docker volumes, which by default get stored in /var/lib/docker/volumes. So when you want to move a container to another machine, you have to remember to move files in multiple locations.
To summarize the challenges with managing containers:
No overview and easy GUI management of running containers and compose projects.
Difficult to remember names of all the services.
Difficult to remember correct port numbers.
Complicated to move containers from one host to another
Solutions to the problems
I’m going to address the problems in the reverse order.
Change the docker root
I’m keeping all my container related files inside /srv/domain.tld. It would be easier if all the docker volumes and networks did the same. Then I can just move the whole directory next time i need to migrate.
You can change the docker root directory by editing the /etc/docker/daemon.json to include the following:
{
  "data-root": "/srv/domain.tld/docker"
}
Before you reload the docker.service, you need to move the existing docker root to the new root location:
~# rsync -vrha /var/lib/docker /srv/domain.tld/docker
~# systemctl restart docker
Now all docker volumes and networks will be created under the new root location.
Use a Caddy container as Reverse Proxy
Caddy is a powerful webserver but I mainly use it as reverse proxy. It’s super easy to configure and it solves alot of problems:
TLS/SSL Offloading. Containers that only has HTTP access can now be reached with HTTPS.
You can also easily add your own webserver certificates or use Let’s encrypt if the services are publicly available.
Use DNS names instead of port numbers.
Design
I’m planning to use a Caddy container per network segment. Right now I only have for Network and Management services but planning to use one for internal services as well.
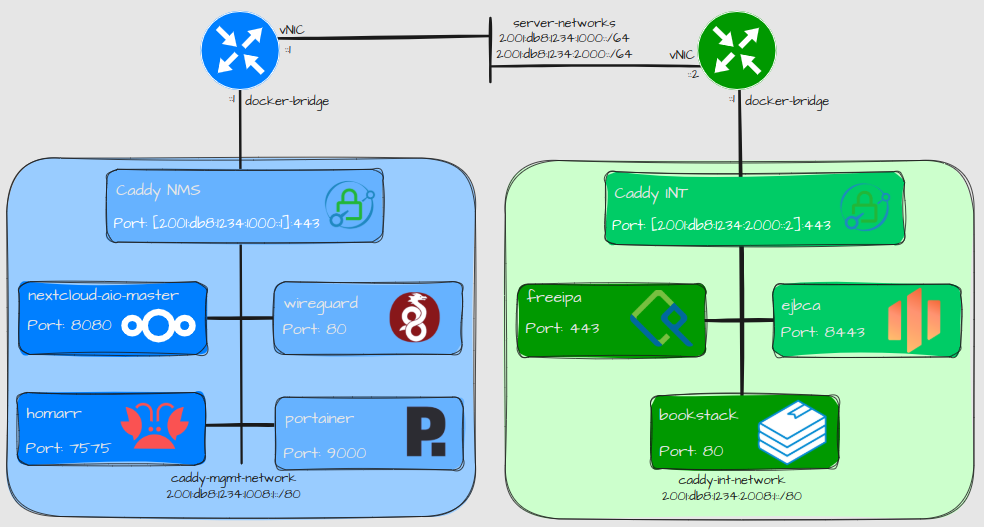
Explanation:
The docker services are configured to listen on specific IPv6 addresses. The IPv6 address exposed indicated which network segment it belongs to.
All containers in the same network segment uses the same docker network.
I don’t have to expose any ports on the other containers as long as Caddy is up and running.
Configuration
Here is an example of my Caddyfile on how easy it is to configure frontend/backend:
# WG-Easy:
vpn.nms.libertassolutions.io {
        reverse_proxy wg-easy:80
        tls /etc/caddy/certs/wireguard.pem /etc/caddy/certs/wireguard.key
}

# Nextcloud AIO Interface:
nextcloud.nms.libertassolutions.io {
        tls /etc/caddy/certs/nextcloud-aio.pem /etc/caddy/certs/nextcloud-aio.key
        reverse_proxy https://nextcloud-aio-mastercontainer:8080 {
                transport http {
                        tls_insecure_skip_verify
                }
        }
}
Explanation:
Caddy is using the container names to forward traffic to the backend containers.
In the first example the container doesn’t run HTTPS in the backend. Caddy is being used to serve as the HTTPS frontend.
In the second example, the Nextcloud AIO backend has SSL activated but with a self signed certificate. Caddy is configured to skip SSL verification for this backend.
Here is the compose.yml file:
services:
    caddy:
        container_name: caddy
        image: caddy:2.10.0-alpine
        # publish everything you deem necessary
        ports:
#            - "80:80/tcp"
            - "[2001:db8:1234:1000::1]:443:443/tcp"
        networks:
            - caddy-mgmt-network
        restart: unless-stopped
        volumes:
            - './Caddyfile:/etc/caddy/Caddyfile:ro'
            - config:/config
            - data:/data
            - /srv/domain.tld/caddy/certs:/etc/caddy/certs
            - /etc/ipa/ca.crt:/usr/local/share/ca-certificates/ca.crt:ro
        command: sh -c 'update-ca-certificates && caddy run --config /etc/caddy/Caddyfile'

networks:
    caddy-mgmt-network:
        name: caddy-mgmt-network
        enable_ipv6: true
        driver: bridge
        attachable: true
        ipam:
            config:
                - subnet: "100.101.1.0/24"
                  gateway: "100.101.1.1"
                - subnet: "2001:db8:1234:1008:1::/80"
                  gateway: "2001:db8:1234:1008:1::1"

volumes:
    config:
    data:
Use Homarr for accessing services
I first saw Homarr in a video by Lawrence Systems and I got inspired. With Homarr you can create one or many different boards with your services on. So in case you forget what the DNS name of your service was, you can easily reach it from one of your boards:
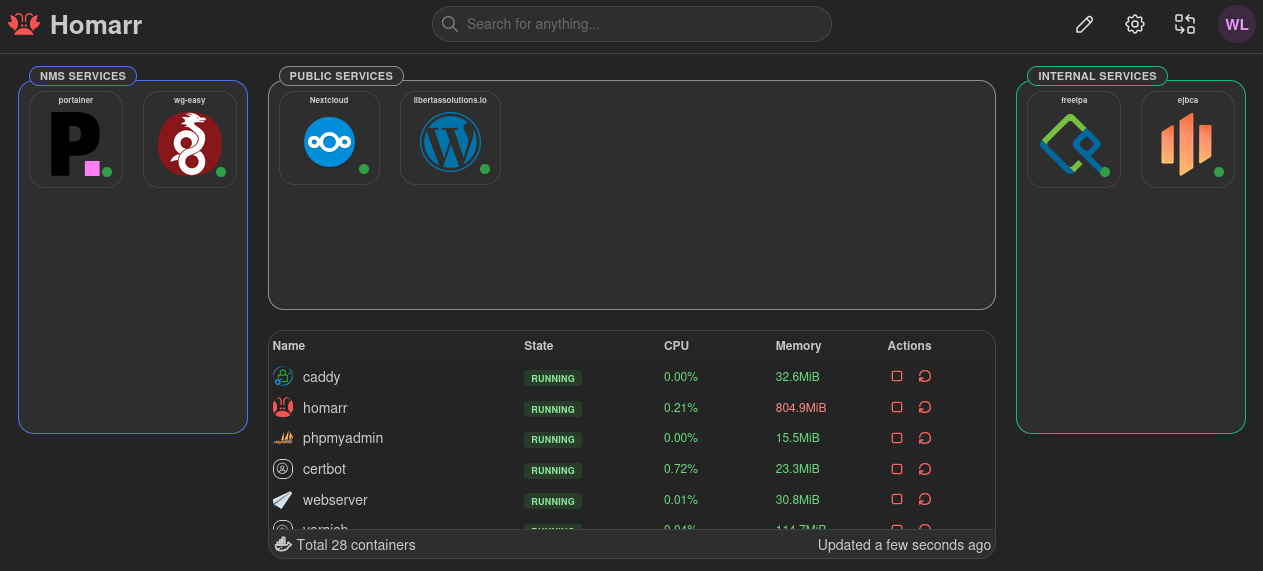
Explanation:
You can also verify that all the services are up.
If you integrate Homarr with docker, you can also check the status of all the containers with a widget. Although not much else you can do with it. That is why we need portainer for more control.
There are also many other types of applications you can add to your boards:

You can also have public boards. and granular user control with LDAP integration. That can have interesting use-cases for cloud hosting.
I am going to share my Homarr setup in more detail in an upcoming post.
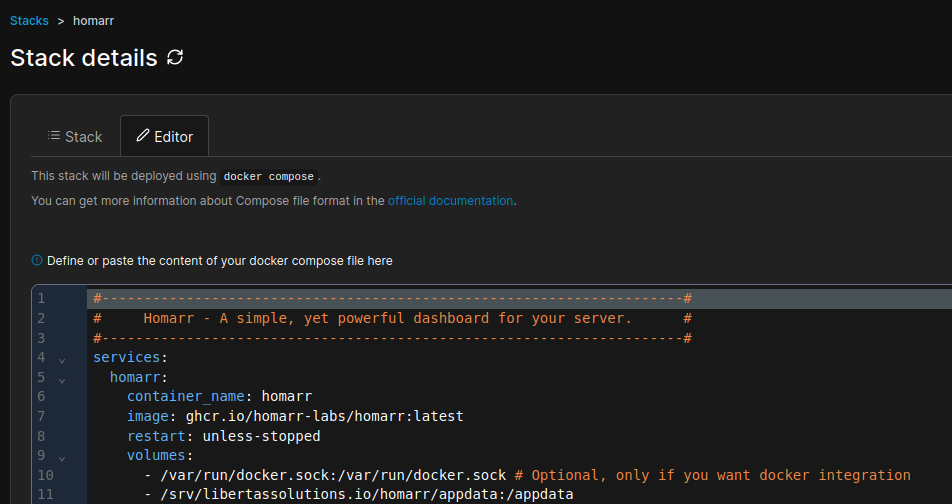
Use Portainer for managing Compose projects
At first I was skeptical of using Portainer because I felt that I lost control of where the container data ended up. However, by changing strategy on how to configure mounts, basically I only use absolute paths instead of relative paths, I now have fairly good control of my compose projects, or stacks, as they are referred to in Portainer. The only file that I don’t have control over is the compose.yml file, which gets created inside the portainer volume. That is a compromise I can live with.
In a nuthsell, to gain control over your volumes while using Portainer:
Change the docker root directory
Only use docker volumes or absolute paths inside the
compose.ymlfile when defining volume mounts.
Then Portainer becomes actually very useful. Now I have complete oversight of my compose projects, while still having control of where the files are being stored on the system.
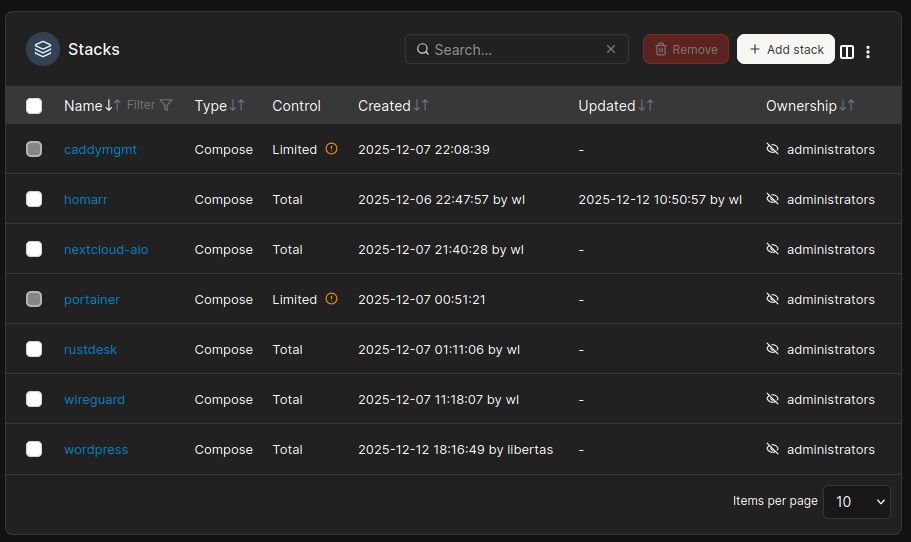
As you can see, all stacks are configured inside Portainer except for:
Portainer, for obvious reasons
Caddy. I like to have the reverse proxy standalone.
Are you running IPv6 as the primary protocol?